After completing my first two challenges from Mozilla P2PU (HTML and Twitter API programming), I have decided to continue the amazing journey of learning new things. So what is up next for me? The answer is learning PHP. What does PHP stand for? It stands for PHP: Hypertext Preprocessor – which is a recursive acronym.
The next question you might be asking is: what the heck is PHP? I will make it simple enough to understand and then leave the rest to PHP on Wikipedia . So, php is an open-source server-side scripting language designed for web development to produce dynamic web pages. Something worth mentioning here is Rasmus Lerdorf – the creator of PHP (Give credit where it is due)!
Before we download PHP, I would like to mention the fact that I am going to download a bundle that has three things in it: 1)Apache web server, 2)MySQL database server and 3)PHP – what we are going to learn here. Thanks to some great people out there, all we need is XAMPP which is FREE!
Now, enough with the talk! Before you start writing any PHP code, you need to install it on your machine. There are several options for different operating systems, but I am going to show you one for Windows. Let us get started by jumping into our search engine of choice below:
Next, we want to locate the right place where everything we need is. There are several options but I normally go with the first or second on the list. There is a good chance that one of them is the most used choice!
From the above snapshot, I have three choices: directly visit the Windows page, go to xampp home page where I will be able to choose what I want and use CNET. Just to be helpful, let us visit the main xampp page!
Navigate to your operating system option – mine is Windows 8 pro. If you click the respective link, you will arrive at the main page: for Windows, I arrived here: NOTE: Look at the list of things that come with XAMPP bundle:
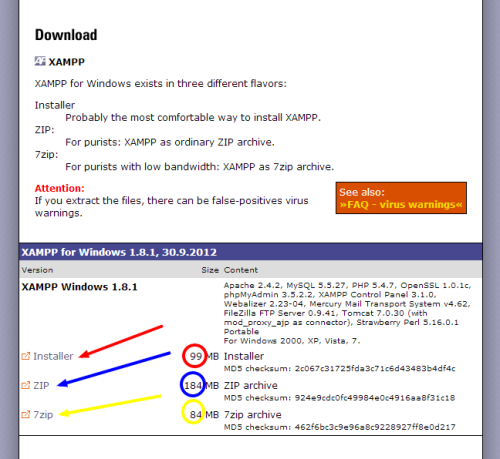
Everything looks great up to this point. Next, we need to scroll down further to locate the download link and start downloading. There are 3 options on how to download xampp and I will choose to use the Windows Installer;
Again, everything looks great! Depending on your internet speed, it will take some time for your machine to finish downloading XAMPP. When the file has finished downloading, if not prompted to run the executable, right click it and Run it. It is easy to access the xampp file if you put it in the C: directory. You don’t have to but it is going to save you unnecessary headaches later. Following the installation wizard, you should see something like this:
The installation process is simple, especially when you are installing the three components (Apache, MySQL, PHP) all at once. Now, the next thing (and I promise we are almost done), is to start and/or stop both Apache and MySQL before testing if your PHP installation worked. It is easy. After installation, you should have a xampp control panel shortcut/icon on your desktop. If not, locate your xampp installation and find the control panel and create a desktop shortcut. Right click the shortcut and you should see:
From the control panel, you can easily start and stop the servers [mainly Apache and MySQL]. You can also start the MySQL shell if you want to use it. Now it is time to test and see if everything works as expected. From your control panel, start both servers [Apache and MySQL] and head on over to your browser and visit: http://localhost/ or http://127.0.0.1/ and if everything is good, you will see something like this:
If you started your servers, then click on status on the left of the above page(indicated by the blue arrow), you will see that several things have been activated. Go ahead and explore what you have there then come back!
One final thing I want to show you before I end this post today: When you write your own files and want to run them as you would expect, where do you save them? You should be able to access your files by visiting for instance : localhost/yourfile.html or localhost/index.php.
Here is the answer: Save your files to htdocs folder! How do you find that folder? Now this is why I recommended installing xampp to C:\xampp directory. Assuming you did that, just right-click xampp folder and then locate the htdocs folder in which you will save your files from here on-wards. That is enough for today, right?
Thank you for stopping by and I hope this helped you set up your working PHP environment and you are now ready to get started with creating some awesome interactive web pages! If you have any questions, please do not hesitate to ask through the comments! Good luck and if you have a blog that you would like me to check out, drop me a link! See you soon!


This is nice article. Good explanation by image. PHP programming is essential for good web development.
Tridhara
I am really glad you found this helpful. If you have any questions, please do not hesitate to ask. Also, if you have any ideas that you feel are missing, let me know so I can add them to my posts in the future.
Thanks for stopping by and hope to see you around more often. Have a good day!