Monthly Archives: January 2013

Building A Shopping Cart – Part 2

Please Visit The Post’s New Location Simple Developer

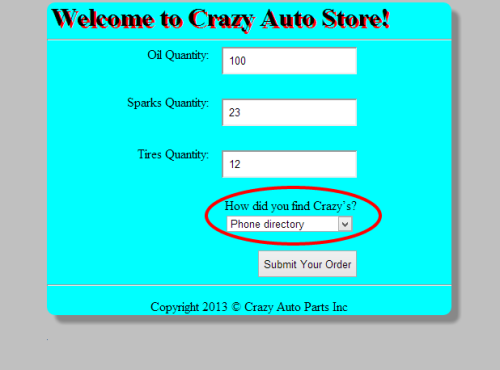
Hi! I had promised to improve our simple shopping cart by adding some functionality to it. Today therefore, I have added a drop-down list to our web store so that customers can select an option describing where they found our store. It could be through television ads, phone directory, word of mouth or other sources. So, without much ado, am going to show you how our page will look like then share the php and html code.

crazy-php-html-code

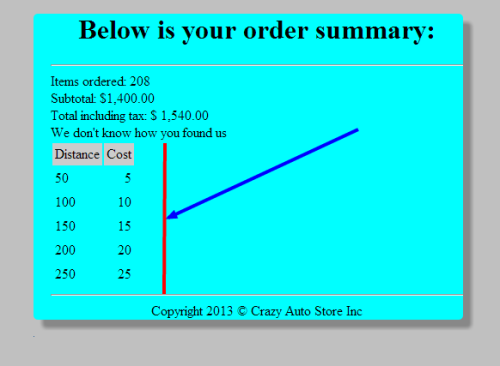
As you can see above, you get a list of different sources. Now, in the next snapshot, I am going to show you another feature that I added to dynamically display a table which you can use to determine your shipping cost. I used a for loop to generate it. Cool!

store-image-php

You might have noticed something new in the above snapshot: the total costs and taxes inclusion. There is also the table shown by the arrow. Now, if you select an option from the drop-down, it will be displayed just below the total amount! Now let us take a look at the code.

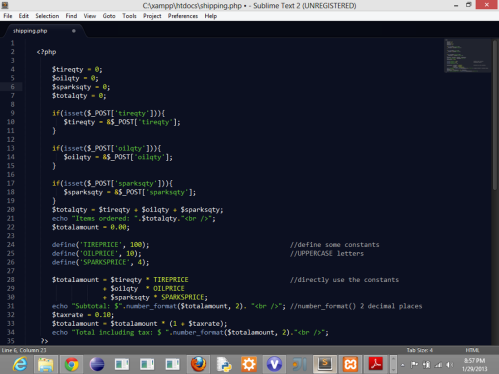
php-code-image

Simply click on the above image for a closer view of the entire code. This code contains some pieces from the first Shopping Cart Part I and then the calculations and constants definition and usage.

Now let us take a quick look at how selections are used in html markup. It is easier than you might think:

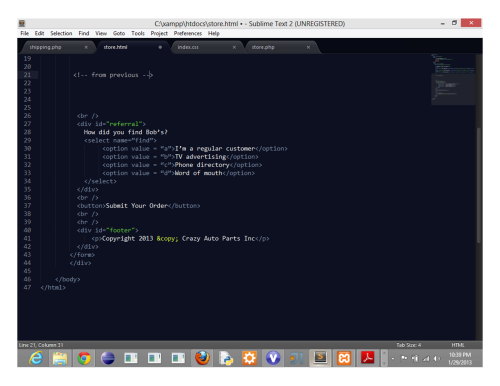
referral-code-selection

What I did here was to simply add a <div> tag just below what I had in my first post. I added to the same file! Again, please click on the image to see the code clearly. Now let us take a look at the switch statement that utilizes the values returned by the above selection:

switch-statement-code

As you can see, using a switch statement is much better than using a lot of if else statements. I went a head and added the code to dynamically generate the table that shows the distance ::: shipping information. I used a for loop! Please click on the image to see a clear version of the image. I apologize for that!

That should do it for today! I know it is not that complicated but I thought it was good for me to start small and then move on to intermediate levels. I really liked reading through the PHP documentations and I think everyone trying to learn how to do scripting using PHP should give it a substantial amount of time. Thanks for visiting and if you have any questions or see any errors, please don’t hesitate to drop me a line using the comments! I will really like to connect with you!

Take care and see you soon!

Building A Simple Shopping Cart Using PHP

Please Visit The New Post Location Simple Developer

Hello there! When I started learning PHP, I began like most other people; the basics. I then promised to show you how to create a simple shopping cart. I have to warn you beforehand, this is not really a complex version. I figured it is smart to start with a simpler version then add more functionality to it as we proceed. So, let us get to it. I am going to do this in reverse, that is, show you snapshots of the cart then dissect the code. So, here we go!

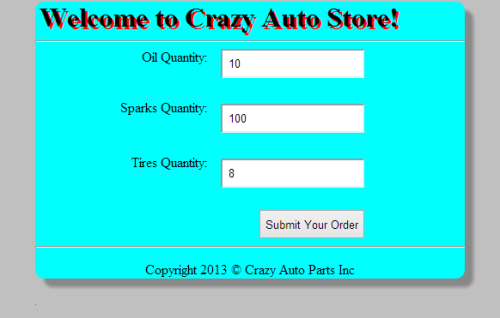
shoppingcart

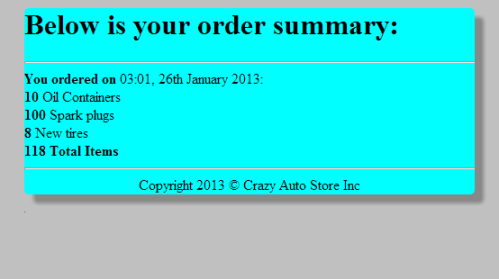
Assuming you were looking for oil, spark plugs and tires for your good old truck, you would visit Crazy Auto Store and add them to the cart. As shown above, you enter the quantities into the input area. Simple right? Assuming you have done that, and hit ‘Submit Your Order’ button: Here is what you will see:

confirmationpage

Yeah, when I said it was going to be simple, I meant it. Now let us take a look at both the [HTML] and [PHP] that made the above possible!

HTML FILE (store.html)


<!DOCTYPE html>
<html>
    <meta charset="utf-8">
    <head>
        <title>Crazy Auto Store</title>
        <link rel="stylesheet" href="index.css" />
    </head>
    <body>
        <div class="container">
          <form action="store.php" method="post">
             <h1>Welcome To Crazy Auto Store!</h1>
             <hr />
             <label for="oil">Oil Quantity: </label><input type="text"
             name="oil" max="3" maxlength="3" /><br />
             <label for="sparks">Sparks Quantity: </label><input
             type="text"
             name="sparks" max="3" maxlength="3" /><br />
             <label for="tires">Tires Quantity: </label><input
             type="text" name="tires" max="3" maxlength="3" /><br />
             <br />
             <button type="submit">Submit Your Order</button>
             <br />
             <hr />
             <div id="footer">
               <p>Copyright 2013 &copy; Crazy Auto Store Inc</p>
             </div>
         </form>
        </div>
    </body>
</html>

That is the html file (store.html). As you can see, I linked an external css file for presentation. Now that we have got that out of the way, we can look back at the first snapshot and see where it came from. Let us get the PHP file started.

PHP FILE (store.php)

<!DOCTYPE html>
<html>
    <meta charset="utf-8">
    <head>
        <title>Crazy Auto Store</title>
    </head>
    <body>
        <div class="summary">
           <h1>Below is your order summary:</h1>
           <hr />
           <?php
               //declare the variables here
               $oilqty = 0;
               $sparksqty = 0;
               $tiresqty = 0;
               $total = 0;

               //Now let us get the values from the form
               if(isset($_POST['oil'])){
                  $oilqty = &$_POST['oil'];
               }
               if(isset($_POST['sparks'])){
                  $sparksqty = &$_POST['sparks'];
               }
               if(isset($_POST['tires'])){
                  $tiresqty = &$_POST['tires'];
               }
               $total = $oilqty + $sparksqty + $tiresqty;
               echo '<b>You ordered on </b>'. date('H:i, jS F Y'). ':';
               echo '<br />';
               echo '<b> '.$oilqty. '</b> Oil Containers <br />';
               echo '<b> '.$sparksqty. '</b> Spark Plugs </br />';
               echo '<b> '.$tiresqty. '</b> New Tires <br />';
               echo '<b> '.$total. ' Total Items </b>';
           ?>
           <hr />
           <p>Copyright 2013 &copy; Crazy Auto Store Inc </p>
        </div>
    </body>
</html>

Again, I used my own css here. This should do it. That is all you need to accomplish what I showed you in the snapshots. Easy right? Just a brief explanation for the php file:
You might have noticed a couple of things: isset() and $_POST[]. I used the isset() method to check whether the values of (oil,sparks, tires) are set in the $_POST[] array. So I have already answered the ‘what is the $_POST[]’ thingy. When you click submit after filling up the form, the data you entered is stored in that $_POST array, that way, you can access them later and do some calculations or magic!

Next time, I will be building on top of what I did today, to add more functionality to our shopping cart! Think about shipping, discounts and more stuff! I hope to see you around and if you have any questions, please let me know and I will be glad to talk to you. Take care!

NOTE: Please Visit my brand new blog at

Simple Developer

Thank you!

A simple python script to find bloggers on twitter

Hi! I know you are probably asking what the heck is he doing? I will be honest here, this is not a tutorial but a simple quick fix to a problem I faced last night. I was invited by an author to take part in the so called blog hopping. One of the requirements was to find at least five other authors with blogs to join the adventure. So, I asked myself, how could I make this as much fun as possible and learn something at the same time?

So today, I packed my gear and headed to a nearby coffee shop to create something. In a few lines later (I had to wait for one hour after I exceeded 150 rate limit on Twitter), I had put together a simple script that helped me reduce the pain of searching for potential bloggers(who are authors).

Assumptions:

  1. I assumed that Twitter users who mentioned the word ‘authors’ were likely to be authors themselves or review books through their blogs.
  2. Secondly, I made a partial assumption that most twitter users who talk about authors had their ‘website’ part of their profiles filled. So, I could easily get their blog addresses. If they didn’t have anything listed, I just moved on.

Now let us take a closer look at the code: part 1

#Let us get our first part out of the way here.
#I am using python, so let us import the needed libraries
import json
import urllib2
url = 'http://search.twitter.com/search.json?q=authors' #link
user_ids = []                            #list to store user_ids
#define our first of the two functions to be used
def get_user_ids():
    data = urllib2.urlopen(url)   #make the call to twitter
    js   = json.load(data)        #parse using json.load() method
    i = 0
    while i < len(js['results']): #you need to know what is returned
        user_ids.append(js['results'][i]['from_user_id_str'].encode('utf-8'))
        i += 1
    return user_ids
#Explanation:
#after getting data from twitter, I iterate through the 'results'
#and grab the from_user_id_str - whoever mentioned the word 'authors'
#I find this more convenient than using a screen name.
#I then add that value to the user_ids list for later use.
#finally, I return the list
print 'Move to the next level now!'

In the second part of this post, I want us to look at the second function definition that will complete our script. Yeah, it is really short!

#Within the same file, we will continue our script!

def get_blogs():
    i = 0
    user_urls = []            #define a list to store the urls
    user_ids = get_user_ids() #get the user_ids and store for use
    while i < len(user_ids):
        url = 'http://api.twitter.com/1/statuses/user_timeline/'+
               user_ids[i] + '.json'
        data = urllib2.urlopen(url) #make the call
        js = json.load(data)
        if js[0]['user']['url'] is not None:
            user_urls.append(js[0]['user']['url'])
        i += 1
    return user_urls

Can you believe we have finished the script? Well, we have reached the end. I know you are saying: show me! And to that question, an answer is worth it – in a snapshot! Let us run this code by doing the following:

#Call the function and store the links in a list.
user_links = get_blogs()
for link in user_links:
    print link

#That is all we need to get everything from the list!!

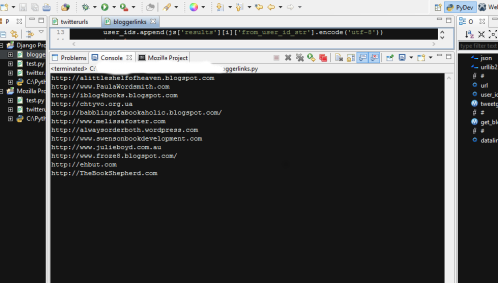
And ….. here is what I got when I executed that code!

finalbloglinks
As you can see, you get easy to read urls that you can open using your browser of choice! One thing you might notice is that not all of the links are either wordpress or blogspot. You can go ahead and improve the script to grab only those links that have either wordpress or blogspot in them. You can view the image clearly by clicking on it!

So why is this a better idea than searching on Google for individual bloggers? Simple; you get a ton of links that you can scan through using your browser, sending requests to their owners and saving yourself some time!

As far as time is concerned, this script makes several API calls during the execution and you will notice a slight delay in completion. Also, you might hit the required rate limit (150) without knowing because you are making several requests per execution. That being said, I still had fun doing this and I have sent numerous requests for blog hops within a short time!

Summary:

I make an API call to Twitter servers to search for the word ‘authors’. Then saved the user_ids of the people who mentioned that word. We then use their user_ids to make another API call to their timelines. While doing that, we grab their url (the property that is part of the Twitter profile). If the url is missing, we ignore, otherwise, we store it in a new list. We finally iterate through the list and print the links out in a clean manner then visit them individually! That is it! I hope you had fun reading through this post. Got questions? Ask them! Thank you.

Free Software Developer Training – 90 Days

Please visit the new location of this post at Simple Developer Site. Thank You!

Hi! Today, I have decided to take a brief detour from my regular posts and share something so good with you. I think it does not hurt to take a breather from all the code and documentations(this is not to say that you should stop reading your docs).

So what do I have in store for you today? Sit back and relax, oh wait, am not going to keep you waiting for long. I will jump right in and give you the information you will need to grab a FREE 90 Day Software Training . This is not a typical training course, it is kick-ass (did I just say that?) and every developer would do anything to get access to it. You get a huge library of step by step training videos (very high quality and corporate level) that you would otherwise pay lots of money for. To make everything easier, I have put together a YouTube video for you. It is easy to follow and it takes just 5 minutes of your time. I think it is totally worth it especially if you can get 90 days of free cutting edge training.

I should stop and let you watch the video already,  right? I hope you find this helpful and share it with others who are interested.

On a serious note, I hope you find this helpful and if you are already using these resources, please pass this video on to those who might need it and cannot afford to pay monthly fees. The only thing one needs is an email address from their college. You don’t need to enter your credit card information or anything that might look fishy. So, without much ado, please enjoy and see you soon.

Remember, if you have any questions, do not hesitate to ask through the comments section.

You can get some ground work done by clicking here and reading through my first tutorial on PHP scripting before we get to build a shopping cart!! I look forward to seeing you around!

Thank you for stopping by. Take care!

What if, else and elseif – Using Conditions

Hello. I figured before I jump into the shopping cart, I should show you how to use conditional statements which are common among many programming languages PHP included. They include if, else, and else if. I will share examples for each case and finally touch on switch statements and Arrays.

#Conditional statements are used to make decisions in programs
#Here is the skeleton:
<?php
    if (condition){
      //do something
    }else{
      //do something else
    }
?>
#Let me drive this point home a little easier!
<?php
    if (your electric bill is due){
       //go pay your bill pal
    }else{
       //don't worry about it, just enjoy the light
    }
 ?>

#Note that you can have an if statement without an else part!
<?php
    $age = 20;
    if ($age > 18){
       echo 'You are old enough to move out now';
    }
?>
#In this scenario, since $age is 20 (greater than 18),
#the condition will be true hence echoing 'You are old enough
#to move out now'. If age was less than 18, nothing would happen
#so, you just keep living in your parents' garage!

#Now let us consider a scenario where you have to choose from
#more than two things:

<?php
    $name = 'Walter';
    $sister = 'Kim';
    if($name == 'Kim'){
       echo 'My name is Kim Kardasian';
    }elseif($name == 'Walter'){
       echo 'My name is Walter Reeds';
    }else{
       echo 'I am not either of those!';
    }
?>

#As an exercise, try out student grades: 90-100: give an A
#80-90: give a B and so forth [give an F a 60!]

#Other ways of making decisions with logical operators:
<?php
    $age = 20;
    $country = 'USA';
    if($age >= 18 && $country == 'USA'){
       echo 'You can get a drivers license now';
    }else{
       echo 'Consult your respective country for this';
    }
?>
#Note: in order for the above condition to work,
#both conditions MUST be true. You can use an OR (||)
#operator to check conditions: In that case,
#short-circuiting takes place::::::::::::::
#if the first part is true, the second part is not checked.
#if the first part is false, the second part is checked.

Alternative: The Switch Statements.

Assuming you have 20 items in a list and you just want to pick one of them. Consider a menu item at your favorite restaurant(I hate looking through those entrees, that is why I almost eat the same thing every time I go there). Now think about writing if statements to check for all of them. Ouch, that will be tedious – the good thing is this: you do not have to do that, thanks to the switch statements. Let us take a look at one now!

#Let us see how useful a switch statement is:
#Grade the student scores - assume a teacher's role!
<?php
    $score = 90;  //you could prompt users to enter score here.
    switch($score){
        case 60:
           echo 'You could have done better than that!';
           break;
        case 70:
           echo 'You have potential to improve!';
           break;
        case 80:
           echo 'Good but not the best. Try a little harder';
           break;
        case 90:
           echo 'Very very good job son, now move on';
           break;
        case 100:
           echo 'Excellent work! Pat yourself on your shoulder';
           break;
        default:
           echo 'You might have been in the wrong class pal';
    }
?>
#Here is a short explanation for a switch statement.
#You might have noticed 'break' and 'default' keywords
#break: this tells PHP that it is the end of the switch
#and so execution should now exit and continue with the rest
#of the page.
#default: this is the last option - just in case none of the
#cases match the correct value. That is it!

Finally, let us give Arrays a good look:

When you want to store multiple values in one variable, you use …you guessed it, an array! Consider these two types of basic arrays: Numeric and Associative arrays:

#Numeric Arrays:
<?php
#if you want to list things you can do this:
    $item_1 = 'Kenya';
    $item_2 = 'USA';
    $item_3 = 'UK';
    $item_4 = 'Brazil';
#----------------------------------------------------
#Or we can actually put all those in an array like this:
    $countries[0] = 'Kenya';
    $countries[1] = 'USA';
    $countries[2] = 'UK';
    $countries[3] = 'Brazil';
    $countries[4] = 'Canada'; #don't forget Canada, right?
#----------------------------------------------------
#Let us now print some of the values in our array!
echo countries[0]." and ".countries[1]." and ".countries[4];

#All arrays have a key and a value and all keys start with a zero
#in numeric arrays as shown above. So, you simply access the value
#by using the key [digit].
#----------------------------------------------------

#Associative Arrays:
#You might be thinking: what if I wanted to use a string
#as the key in your array? Yeah, good point and there is no
#need to beat around the bush here, we call that Associative arrays
#-----------------------------------------------------
$countries['kenya'] = 'Found in Africa';
$countries['usa'] = 'Located in North America';
$countries['brazil'] = 'In South America';
$countries['china'] = 'Asia anyone?';

#We can echo them like numeric arrays! Sweet.

echo $countries['usa']." and ". countries['kenya']." whatever here";

?>

Putting Arrays To Use:
The biggest question running through your mind might be: when and do we use these Arrays? Let us take a quick look at an example here and let you go out to the world as an explorer for more knowledge!

#Let us create a brand new array here and add some stuff to it:
<?php
    $students = array('Alexie', 'Jimmy', 'Kim', 'Grace', 'Peter');
    #you can create an array that way! Easy right?
    #Now let us use our array to do crazy cool stuff!
    if(in_array('Jimmy', $students)){  #hay in a haystack!
       echo 'Jimmy is one of the students'; #true
    }else{
       echo 'Jimmy is not one of the students. <br />';
       echo 'We only have the following names:<br />';
       foreach($students as $student){
          echo $student. '<br />';
       }
    }

#So what did we just do there? In short, we created an array,
#using the array() function,
#added some values to it and then use one of the array functions
#or methods (in_array) to check if a certain value exists in the
#array. If the value exists, we simply print it out, otherwise,
#we say that it doesn't exist and print all the values using
#a foreach construct.

#Other things you can do with arrays:
echo count($students);    #what is your guess?
echo key($students);      #get the index element of current array
echo rsort($students);    #sort in reverse

echo 'Visit PHP documentation for more array functions!';
?>

Summary:
Thank you for reading through this long post. I really wished it was shorter but hey, I could have shortened it and miss some important stuff. Either way, I think I have covered some significant ground here as far as if else statements, switch statements and finally arrays(watch out for hash tables, they mean the same thing in the PHP world). Because I did not exhaust everything here, I want to leave you with a link to the PHP documentation where it all started!

PHP Documentations

Thanks again and if you have any questions or have spotted any errors in my post, let me know. Any opinion(negative or positive) is very important and much appreciated. I have said this before but I think my next post will include building a simple shopping cart! See you soon and get coding!

A really brief introduction to PHP syntax

To kick off my php learning journey, I am going to start with some syntax then jump straight into building a simple shopping cart. Sounds exciting right? So, let us get started. Note: if you have used other languages like Java or Javascript, you will find some syntax used in PHP quite familiar. If this is your first language, do not worry, it is actually easier than you think: One more warning: The reason why I will not spend so much time teaching syntax is because there are more than enough tutorials online that do just that and I didn’t want to create yet another one!

Every time you write php code, you must put it inside the following tags:


<?php
   //Your PHP code goes right here!
?>

Remember to end all php files with a .php extension for example if we had a file called index, then we would save it as index.php. Easy breezy right?

Next: let us create our first “Hello, World” page using php. So what do we need? Well, we have already learned how to include php inside the tags, now we need to put everything we have inside an HTML page! Take a look at this: index.php

<!DOCTYPE html>
<html>
     <head>
          <title> Hello World php</title>
     </head>
     <body>
          <?php
              #this is php code inside html
              #Remember to end statements with semi-colons.
              echo 'Hello, world';
              echo 'This is my first web page using php';
          ?>
     </body>
</html>

I am suspecting you have already guessed what our web page will look like. So, what does ‘echo’ do? It simply prints to the page(no pun intended). One other thing to know is that there is a ‘print’ method too, that does the same thing; prints to the page whatever is to the right of it. I hope you are following along with your own code.

Variables in php:

All php variables start with a dollar sign ($) or they will not work! Let us take a look at some variables before we start doing other things:


$age = 20;              #stores integers
$price = 2.50;          #stores doubles
$weight = 150;
$first_name = 'Johnny'; #stores a string - 'Johnny'
$is_qualified = false;  #stores a boolean - false
$registered = true;     #stores a boolean - true

/*
$age is not the same as $Age ----------
because variables are: case-sensitive
This is another way of commenting in php
*/
echo $age;              #this will show 20, try it.
echo $weight;           #this will show 150, go try it.
echo $first_name;       #Johnny
print $registered;      #true

/***********
what will this print? Lesson: we use (.) dot operator to join
strings with other strings or variables
***********/
echo 'I am '.$age.' years old and weigh '.$weight.' pounds';

At this point, it is good to ask yourself(especially if you have used Java or C++ before), how does the PHP engine know the type of the variable? The answer is that you do not need to declare the type of a variable in php because the engine determines it for you. It simply checks the value of the variable and that does the trick. The same thing happens in Python!

String Manipulation in PHP:

There are several methods that we can use to manipulate strings. I will step through just a few of them for now. I am really trying to avoid making the longest post ever. Let us jump to it:

$greeting = "good morning php students";

#Now let us find the length of that greeting
echo strlen($greeting);                   #25?, try it.

#Now let us turn all words that start with lowercase
#letters into capital letters
echo ucwords($greeting);    #prints 'Good Morning Php Students'

#Now let us make all letters uppercase
echo strtoupper($greeting);  #GOOD MORNING PHP STUDENTS

#Now let us make all letters lowercase
echo strtolower("NEW YORK"); #new york

There are more methods that you could explore further but I am not going to create another PHP documentation here. So, when you are done with this post, head over to PHP String Functions where you will find awesome information on the same subject.

Operators in PHP:

There is always need for math: In php, there are four kinds of operators and they include the following:

  1. Arithmetic operators
  2. Assignment operators
  3. Comparison operators
  4. Logical operators.

I will try to go through them here but it is a good idea to practice using them. I guess they didn’t lie when they said practice makes perfect! I will not exhaust the list here.

Arithmetic Operators:

#addition (+)
$x = 10; echo $x + 5;        #displays 15

#subtraction (-)
$x = 10; echo $x - 5;        #displays 5

#multiplication (*)
$x = 10; echo $x * 2;        #displays 20

#divide (/)
$x = 20; echo $x / 5;        #displays 4

#modulus (%)
$x = 15; echo $x % 7;        #displays 1 (remainder)

#increment (++)
$x = 10; echo $x++;          #displays 11 (add 1)

#decrement (--)
$x = 5; echo $x--;           #displays 4 (subtract 1)

Comparison Operators:

#is equal to (==)
10 == 10;                  #returns true

#is not equal to (!=)
3 == 10;                   #returns false
4 != 50;                   #returns true
10 != 0;                   #returns true

#is not equal to (<>) same as !=
3 <> 4;                    #returns true
15 <> 15;                  #returns false

#greater than (>)
10 > 1;                    #returns true
100 > 150;                 #returns false

#greater than or equal to (>=)
10 >= 10;                  #returns true
15 >= 20;                  #returns false

#less than (<)
23 < 100;                  #returns true
10 < 4;                    #returns false

#less than or equal (<=)
15 <= 15;                  #returns true
14 <= 10;                  #returns false

Logical Operators:

#and (&&)
$x = 10; $y = 30;
$x > 0 && $y < 20;    #returns true

#or (||)
$x = 5; $y = 15;
$x == 5 || $x == 15;  #returns true

#not (!)
$x = 4; $y = 8;
!($x == $y);          #returns true

Assignment Operators:

# (=)
$x = 13;              #assigns 13 to $x

# (+=)
$x += 10;             #same as $x = $x + 10;

# (-=)
$x -= 10;             #same as $x = $x - 10;

# (*=)
$x *= 2;              #same as $x = $x * 2;

# (/=)
$x /= 10;             #same as $x = $x / 10;

# (.=)
$x .= $y;              #same as $x = $x. $y (string joining)

# (%=)
$x %= 7;              #same as $x = $x % 7;

That is enough for today! Phew! Next time, we will build a simple shopping cart using php! I am excited already and I hope you are too!
If you have questions, please let me know and I will be glad to help. Thanks for stopping by.
Programming With PHP – Setting Up The Camp

After completing my first two challenges from Mozilla P2PU (HTML and Twitter API programming), I have decided to continue the amazing journey of learning new things. So what is up next for me? The answer is learning PHP. What does PHP stand for? It stands for PHP: Hypertext Preprocessor – which is a recursive acronym.

The next question you might be asking is: what the heck is PHP? I will make it simple enough to understand and then leave the rest to PHP on Wikipedia . So, php is an open-source server-side scripting language designed for web development to produce dynamic web pages. Something worth mentioning here is Rasmus Lerdorf – the creator of PHP (Give credit where it is due)!

Before we download PHP, I would like to mention the fact that I am going to download a bundle that has three things in it: 1)Apache web server, 2)MySQL database server and 3)PHP – what we are going to learn here. Thanks to some great people out there, all we need is XAMPP which is FREE!

Now, enough with the talk! Before you start writing any PHP code, you need to install it on your machine. There are several options for different operating systems, but I am going to show you one for Windows. Let us get started by jumping into our search engine of choice below:

Google

Next, we want to locate the right place where everything we need is. There are several options but I normally go with the first or second on the list. There is a good chance that one of them is the most used choice!

downloadpage

From the above snapshot, I have three choices: directly visit the Windows page, go to xampp home page where I will be able to choose what I want and use CNET. Just to be helpful, let us visit the main xampp page!

page2xampp

Navigate to your operating system option – mine is Windows 8 pro. If you click the respective link, you will arrive at the main page: for Windows, I arrived here: NOTE: Look at the list of things that come with XAMPP bundle:

page3xampp

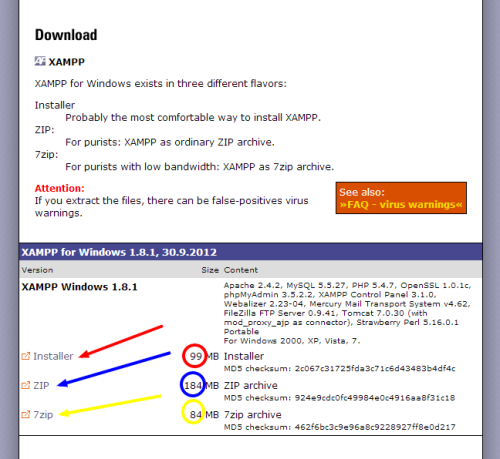
Everything looks great up to this point. Next, we need to scroll down further to locate the download link and start downloading. There are 3 options on how to download xampp and I will choose to use the Windows Installer;

page4xampp

Again, everything looks great! Depending on your internet speed, it will take some time for your machine to finish downloading XAMPP. When the file has finished downloading, if not prompted to run the executable, right click it and Run it. It is easy to access the xampp file if you put it in the C: directory. You don’t have to but it is going to save you unnecessary headaches later. Following the installation wizard, you should see something like this:

location2xampp

The installation process is simple, especially when you are installing the three components (Apache, MySQL, PHP) all at once. Now, the next thing (and I promise we are almost done), is to start and/or stop both Apache and MySQL before testing if your PHP installation worked. It is easy. After installation, you should have a xampp control panel shortcut/icon on your desktop. If not, locate your xampp installation and find the control panel and create a desktop shortcut. Right click the shortcut and you should see:

xamppcontrol

From the control panel, you can easily start and stop the servers [mainly Apache and MySQL]. You can also start the MySQL shell if you want to use it. Now it is time to test and see if everything works as expected. From your control panel, start both servers [Apache and MySQL] and head on over to your browser and visit: http://localhost/ or http://127.0.0.1/ and if everything is good, you will see something like this:

testinstallationg

If you started your servers, then click on status on the left of the above page(indicated by the blue arrow), you will see that several things have been activated. Go ahead and explore what you have there then come back!

One final thing I want to show you before I end this post today: When you write your own files and want to run them as you would expect, where do you save them? You should be able to access your files by visiting for instance : localhost/yourfile.html or localhost/index.php. 

Here is the answer: Save your files to htdocs folder! How do you find that folder? Now this is why I recommended installing xampp to C:\xampp directory. Assuming you did that, just right-click xampp folder and then locate the htdocs folder in which you will save your files from here on-wards. That is enough for today, right?

Thank you for stopping by and I hope this helped you set up your working PHP environment and you are now ready to get started with creating some awesome interactive web pages! If you have any questions, please do not hesitate to ask through the comments! Good luck and if you have a blog that you would like me to check out, drop me a link! See you soon!

Victory is Yours – Going Public (github)

This happens to be my last post on this Programming With Twitter API journey. I do not feel sad because this is actually just the beginning! I will not stop here, I will keep making something better out of it. This has been a great adventure, very informing and fun. So, without much a do, I want to show you(if you have not done this before), how to make our code publicly accessible to interested people who want to read it and even use it for their own learning or applications. I am going straight to github – by the way this is not the only one, look for bitbucket or something that makes you happy.

github

So, once we are over at Github.com , we can grab a free account for now and then do some cosmetic setups and off we go. It is a simple process that should take you less than 5 minutes or ten at most. For easier commits, you should download github onto your machine then perform these two actions to set it up for usage:

#After installing github on your machine, you set up
#first the username, then the email by entering these
#commands onto your terminal

$ git config --global user.name "your user name here"
#sets the default name for use by git when you commit

$ git config --global user.email "your email"
#sets the default email for use by git when you commit

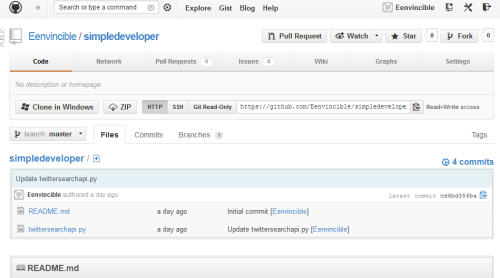
That will make your work so much easier because you will just publish new code without having to visit github website. Take a look at what I did here:

lastgithub

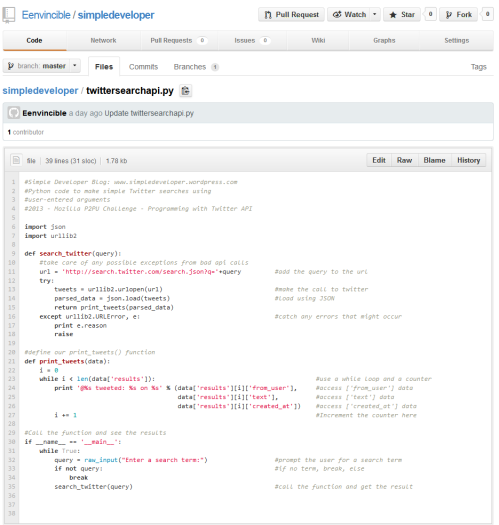
If you look keenly at the snapshot above, you will see how a typical page looks like once you have logged into your repository. Just below the page is a list of files that include an optional README. Finally, I would like to show you how opened files will look like on Github. It is a good skill to comment your code because you never know who will be reading it and most importantly, you yourself will be reading it a few years from now. It will be shameful not to understand your own code!

githubpage

So, there you have it. Every time you want to review your code, or improve it, you can do so without any worries of losing it. Github is your friend, always there for you when you need it. I hope you found this post useful and you will have your awesome scripts available on Github for others to read and even use.

You can easily access my repository on Github by visiting simpledeveloper .

Thanks and please subscribe for updates if you like what I do here.

The Force Is Strong With This One

So, we are almost at the end of the journey here and I am so excited to do so. In my previous post, I demonstrated how to pick up the pieces from the returned data and put them into a single file. That was easy right?

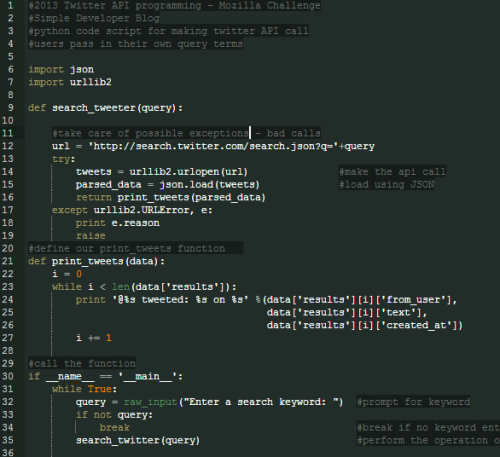
The problem is that if someone else wanted to use my code, they would have to change parts of the code every time, which is not very smart! Today, I am going to put our code together, encapsulate it in a function that will take one parameter from the user and perform the tricks behind the scenes and boom, you get clean tweets containing the query keyword you entered. I know, I should stop talking and show you what I did:

twittercodes

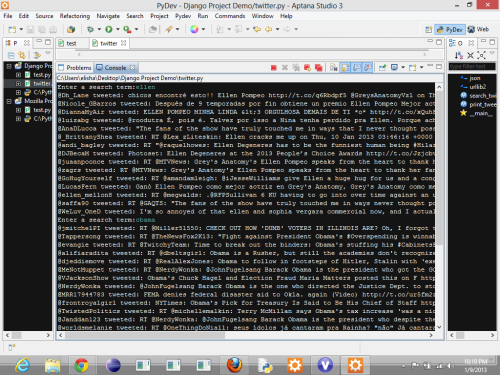
I hope you are able to read that piece of code. You can also click on the image to view a clearer version of it. Now, all you need to do to see the results is pass in a value to the prompt and then the code will do its job for you. Think of a word, answer the prompt and see what is happening on twitter. I thought of  ‘ellen’, ‘obama’, and 2013: Here is what I got in that order:

outcome

So, after running three tests, I had what you see above and it obviously look like a lot of tweets or sentences but with a few formatting tricks, you could make them look pretty easy to read! Again, just click on that image for a better view!

Go ahead and run the code, add some styling and see what happens.

So, in just a few steps, we have gone from typing into our browsers a url that returned a bunch of messy data from Twitter servers, to digging into the data and retrieving important pieces, and now, we have taken the bold move of making our code more useful – anyone can run it, with any keyword and still get results.

I hope this was helpful to you and if you have any questions, please do not hesitate to ask me through the comments section. Let us connect, we can learn a lot from each other!

Thanks for visiting and please remember to subscribe for updates!

Patience, Young Padawan – More Code

Today, I am going to explore farther or deeper into what we can do with what Twitter API calls returns to us. I will make the whole post a step-by-step tutorial so that anyone interested in trying the codes out can do so with ease. So, let us get started.


#Always remember to use comments when writing code
#since we are using Python as our programming language
#of choice, we will make sure to import the necessary
#modules or libraries into our file

import urllib2
import json

After importing the modules or libraries that we will need during our coding adventure, we can now start writing some code. Remember to exercise self-documenting programming. Use variable names that describe what the variables store!

#Create a variable to store the url - twitter api link
#Make the api call and store the returned value in a variable
#I am querying twitter for "nbcbetty" - Off Their Rockers!

url ="http://search.twitter.com/search.json?q=nbcbetty"
tweeter_data = urllib2.urlopen(url)
parsed_data = json.load(tweeter_data)

After making our API call to twitter, we get JSON data back but we cannot do much with it considering how messy it is. Using JSON’s load method, we convert that data into easy to use information (dictionaries). Now let us do some cool stuff!


#Now let us perform some magic here with the 'parsed_data'
#Think up something cool? I have you covered!
#let us make some sentences from tweets by English speakers
#only about #NBCBETTY. Good idea right?

i = 0       #define a counter variable and assign 0
while i < len(parsed_data['results']):
    if parsed_data['results'][i]['iso_language_code'] == 'en':
        print "@%s tweeted: %s on %s about Off Their Rockers Show!" %
        (parsed_data['results'][i]['from_user_name'],
        parsed_data['results'][i]['text'],
        parsed_data['results'][i]['created_at'])
        i += 1
#I used line breaks because the space was too small! Sorry.
#If you run that code - assuming you copied it correctly,
#you should get easy to read lines of sentences(tweets)
#saying @username tweeted something on [date] about Off Their
#Rockers

This is what you get depending on what your query is:

@Carmalva tweeted: @NBCBetty wish all the victims would give us feedback on their reaction after seeing themselves on tonites episodes…lmfao on Wed, 09 Jan 2013 02:35:35 +0000 about Off Their Rockers!
@Shannon Dawn Tripp: tweeted I just love Betty White! http://t.co/WmaGmKuj #GetGlue @NBCBetty on Wed, 09 Jan 2013 02:34:55 +0000 about Off Their Rockers!
@Sue Troupe tweeted: I’m watching Betty White’s Off Their Rockers (3693 others checked-in) http://t.co/esqNxT11 #GetGlue @NBCBetty on Wed, 09 Jan 2013 02:33:30 +0000 about Off Their Rockers!


#Putting all together!
#grab all the pieces and put them together into a script that you
#yes, you could run from your command line!
#you can make this code more elegant than this - try!
#-----------------------------------------------------------#
import urllib2
import json

url = 'http://search.twitter.com/search.json?q=nbcbetty' #q=karma ??
parsed_data = ''
try:
    tweeter_data = urllib2.urlopen(url)   #make the call safely
    parsed_data = json.load(tweeter_data) #assign to parsed_data
except urllib2.URLError, e:               #catch any exception
    print e.reason
    raise

i = 0        #create counter variable

while i < len(parsed_data['results']):   #iterate through data
    if parsed_data['results'][i]['iso_language_code'] == 'en':
        print "@%s tweeted: %s on %s about Off Their Rockers!" %
        (parsed_data['results'][i]['from_user_name'],
        parsed_data['results'][i]['text'],
        parsed_data['results'][i]['created_at'])
        i += 1
#-------------------------------------------------------------#
#that should do it!
#Study that script closely and look at what you received from Twitter
#print out the keys, compare them with what you see here and
#try more! Search for the craziest thing you can think of

Possible ideas using Twitter APIs and a programming language of choice:

  • Make an API call to Twitter with a search query q=[your own city]
  • Try a query with q=:)  – this is an emoticon (sad or happy face)
  • Try your favorite word, and see where it is commonly used.
  • Create a script that makes calls every five minutes and displays the top 20 latest tweets.
  • There are more things to think about, so, go do!

I hope this post helped you learn something new. Next time, I will be doing something else, building upon what I did today. If you have any question, please do not hesitate to ask. Use the comments section and I will be more than happy to help.

Thanks and see you soon!