Category Archives: General Hacks

I Just Moved – A Friendly Reminder

moving-wordpress-blog

I am creating this post to let you know that I have started the process of migrating from this wordpress-hosted blog to a self-hosted one which is located at, well, Simple Developer. I am still fixing a few errors like syntax highlighting and things like that.

Besides that, everything should be fine now. I humbly request those who had subscribed to this blog to consider subscribing to my new blog which is still a wordpress platform.

Thank you for your loyalty as readers and I hope we can connect with each other as time as goes by.

Take care and see you at http://www.simpledeveloper.com !

What To Do After College and Without a Job

So you just graduated or even lost your job and you are looking for a new one. Everywhere you look, you see bad news. Everybody seems to be smarter than you, more experienced and yet willing to take less pay for the gig. You have spent so much money running around mailing your resume. It is a messy world you say.

job-interviews

The fact is, it doesn’t get any easier. What do we do now, you ask?. I am not an expert but I will give you my 2 cents. Here are some of my favorite tricks that could get you going. NOTE:  A previous study showed that only 2 percent of professionals actually use their degrees. This means that just because you have a degree in business doesn’t necessarily mean you must work in that field.

  1. NETWORKING – I list this as the first thing to do for a reason. You are more likely to get a job through referral than other means. If there is something students in college should be doing besides studying and partying, it is making connections. Save those contacts because you will need them later. If you didn’t do so, you can still catch up by using LinkedIn and other social networks. Attend local events where you will meet new people with similar interests. There is more to networking than this short description but you get the idea.
  2. VOLUNTEER – Volunteering is not easy especially when you have bills to pay. I say this because when I refer to being a volunteer, it simply means you are offering your services for FREE. The benefits sometimes outweigh the effort. How? One thing you can do while applying for a job is mention the fact that you volunteered at company A or B. Good Karma. It is better to volunteer than to sit on your couch watching reality television and eating chips. So, find a local charity or a company that could benefit from your skills. Heck, you might even get hired if they think you are worth it.
  3. JOB-SEARCH – Oh wait a minute, I am already doing this right? I totally agree with you here but I wanted to say something more specific. It is tempting to blame the economy for lack of jobs especially when you have no idea where to look. One advice I was given by someone was that when it comes to job hunting, you should make the search a full time job. The only difference is that you don’t get paid, in fact, you spend your own money running around from office to office. Warning: Do not do this: ‘You do so many interviews, when you reach your 40th interview, you ask your interviewer the name of his company! ‘ Got it? I must mention also that you can do networking and volunteering as you job search.
  4. START A BUSINESS – If you have been trying to find a job for too long without any luck, perhaps you can start your own business in your garage. Of course this move is tricky and sometimes expensive to take. Perhaps you have identified a market gab and you feel like you can help fill it. You might be a software developer and you have a great product that could revolutionize the way people do things. With today’s world, opportunities are vast but you have to work hard and smart for it. Depending on your area of expertise, I promise, there is something out there that you can do to make extra cash. Since starting a business requires some capital, you might consider looking for professional advice on how to get started.
  5. JOIN oDESK – This is just one place where you can keep your skills sharp by doing freelance work. There are thousands of people out there looking for people like you to help them get their jobs done. You might not be paid much but you will get to build connections that could lead to greater opportunities down the road. Did I mention creating a portfolio? That will come in handy when applying for a job. You want to have something to show when your interviewer asks “what projects have you worked on before?” 
  6. JOIN QUORA – This is my favorite website. You might be wondering why I even listed it here. Let me cut it to the chase: if you want professional advice, links to the best resources that you would otherwise pay a lot of hard-earned money for, help others by answering questions in areas of your expertise, and most of all, meet awesome people – Quora is your friend. It is totally FREE of charge. Warning: You might get addicted to it and that could make your girlfriend, boyfriend or spouse really mad at you – in that situation, you can tell them to blame me for it.
  7. START A BLOG – This is obviously not for everyone. Most often, maintaining a blog is a challenging task especially if you don’t have a specific idea or subject to write about. From a horse’s mouth – before I started this blog four months ago, I tried blogging and failed several times. I thought people didn’t really like what I was posting. It is easy to talk about everything and end up talking about nothing. I advise you to find something specific that you are good at and get started. Set a schedule and you will be amazed by the experience. In fact, you might be surprised by your interviewer by asking you whether you have a blog or not!
  8. WRITE A BOOK – One amazing thing about life is that when one door closes, more than one door opens. In this case, ebook publishing is a door that leads to potential success. Let us be honest here, you have a story you would like to tell. There is a book in you. If I was able to write a book and self-publish it, reach more than eleven thousand (11,000) downloads on Amazon Kindle alone, then why can’t you do it?  It is amazing how things work. Give it a shot, starting with a few hundred words every day or weekend. Talk to me if you need help.
  9. EXERCISE + FOOD – I am not a food and fitness expert but we all know that you are better equipped when you are eating healthy and exercising. Just because you don’t have a job doesn’t mean you should let your cholesterol get out of control. Take care of your body. It is easier to get tempted when you don’t have enough money to eat junk food and I totally understand it. That does not mean you should give up the fight. Just do your best to remain healthy.
  10. MORE – The list goes on and on. However, I am going to stop here because I know you have other things to do. Go out there, make a clear plan of what you really want to do. Hire a resume service and get down to work (job searching of course). Prepare to be turned down several times. Never give up. If you have other ideas, please share them through the comments section.

At the end of the day, if you are lucky to be interviewed, be honest because it is not morally upright to lie. It is easier to be caught lying. Do whatever it takes to be ready for that job because you never know when you will be meeting your next employer. With that in mind, happy April Fools Day! I am not fooling you at this point. Good luck and see you soon.

The Big Questions That I ask Myself

Hello! I have decided to step a side today and post something outside programming. I have always fought the urges to act robotic by reminding myself that after all is said and done, I am indeed, a human being who has questions. I laugh really hard when tickled. I cry when hurt. I bleed when pricked. Most often, my questions never get answered.

life-big-questions

Today some people are celebrating Easter – and so “Happy Easter”. I say ‘some’ because there are those who don’t do it.

One of the biggest questions I have started asking myself is “what really happen to us when we die” and immediately after that question comes? “where do we really come from?”. Believe it or not, every time I hear people talk about the absence of a higher power, I don’t give them a dead ear – instead, I listen to what they have to say and then ask them “but how did everything happen to be?” I know some Physics and I obviously won’t start an endless discussion here on how there had to be a force that started the process of life.

What if we were not named “human beings?” I don’t really know. You might say that I could use some serious scientific reading and whatnot and I agree. However, every day I step outside my house and look around me, I see things that I can’t even explain. I see trees and rocks. I hear birds of prey singing. I am not blind to the fact that there is more to life than just what I can and cannot see.

Consider a rich guy who has worked so hard to be where he is today. The fact is that he has a right to drive the most expensive car as he pleases. He can live the best lifestyle(best here means he can buy whatever he wants). You can also look across the oceans or anywhere around the world and see poor children dying of hunger. The question is: can you really say the rich guy should take some of his money and help those poor kids? It would be a humane gesture but quite complicated. The reason is simple: you can argue for and against it. Most obviously he has a right to say no.

The other aspect of life is that perhaps if we worked a little harder, just an extra mile, we might feel satisfied with our lives. Make some extra dollars, live in a bigger house, make the best friends and have a perfect family. Most of us believe that we have to do all that in order to be happy. I don’t know about you but I would like to have a nice house and a car. Do I sound greedy? Perhaps but am not. Aren’t we advised to work really hard and earn stuff? What about those who have worked hard and yet they still cannot see success? Is it their fault? Are they lazy? Or maybe they don’t know how to define success!

I believe that most of us have focused so much on making a living, forgetting to make a life. Maybe we could have a fresh start by asking ourselves what we really want and need. We might be looking too far away instead of looking closer. Inside. The day we start to understand what we can do with what we already have, we will be happier than ever. It is not about having a lot of friends. It is about appreciating what I already have. Showing them that I care. Being human. It is not really hard. Start small.

I am going to stop here. Thank you for reading. I hope you have a good day. See you soon and you are welcome to leave a comment below this post. Always remember that it is not much to do with where we have come from, rather, it is where we are headed in this life. Stay safe and strong.

Programming With Google Maps APIs – Part V

Hello! I am back and I hope you are doing good today. At the end of my fourth Google Maps APIs  post, I mentioned in passing that I will be starting with Markers today and that is exactly where I will start. To make things fun, here is what a marker looks like – you have probably seen one if you have used a map before!

google-maps-api-marker

There you have it! So a marker is a small image that is positioned at a specific place on a map. Now we can figure out how to add it to our own map. We will start with a basic code for our map.

(function () {
    window.onload = function () {
        var mapDiv = document.getElementById('map');
        var latlng = new google.maps.LatLng(40.7257, -74.0047);

        var options = {
            zoom: 12,
            center: latlng,
            mapTypeId: google.maps.MapTypeId.ROADMAP
        };
        var map = new google.maps.Map(mapDiv, options);

    };
})();

Adding a Marker
You can choose to go with the default look of a marker or create your own. I will use the former in this example. A marker is of type google.maps.Marker object. This object takes one parameter which is of type google.maps.MarkerOptions . MarkerOptions has several properties that you can use to make the marker look and behave different but the basic two are: position and map.

position – this property defines the coordinates to place the marker and takes an argument of type google.maps.LatLng object.

map – the map property is a reference to the map to which you want to add the marker.

Example code for a marker

(function () {
    window.onload = function () {
        var mapDiv = document.getElementById('map');
        var latlng = new google.maps.LatLng(37.3700, -122.0400);

        var options = {
            zoom: 12,
            center: latlng,
            mapTypeId: google.maps.MapTypeId.ROADMAP
        };
        var map = new google.maps.Map(mapDiv, options);

        var marker = new google.maps.Marker({
            position : latlng,
            map : map
        });

    };
})();

There you have it. Oh wait, we have not seen it actually on a map yet. Here it is:

google-maps-api-markers

Adding a tooltip

We might both agree that adding a tooltip to our marker will make it much better. A tooltip is a yellow box with some text in it that appear when you hover your mouse over a marker. To add it to our marker, we simply use title property of the MarkerOptions object.

. //minimized code here from above
.
.
var map = new google.maps.Map(mapDiv, options);

var marker = new google.maps.Marker({
            position : latlng,
            map : map,
            title: 'Click Me Now'
});

One thing to note is that you are not limited to using the default marker icon. In fact, Google hosts a ton of other icons that you can freely use. In order to use a different icon, you provide a url location to it like this:

var marker = new google.maps.Marker({
             position: latlng,
             map: map,
             title: 'Click Me Please',
             icon : 'http://youricon-location.com'
});

Adding an InfoWindow

Normally when marking a place on a map, you might want to show more information related to that place. Google Maps APIs provides a way to do so using InfoWindow. It looks like a speech bubble and appears on top of a marker when you click it.

InfoWindow resides in the google.maps namespace. It takes one argument which is an object called InfoWindowOptions. Just like MarkerOptions object, InfoWindowOptions has several properties but the most important one is the content.  This property controls what will show inside the info window. It can be plain text, HTML or a reference to HTML node.

Code Example:

. //minimized code
. //save space
.
var map = new google.maps.Map(mapDiv, options);
var marker = new google.maps.Marker({
            position : latlng,
            map : map,
            title: 'Click Me Now'
});
//added a class for styling the window
var infowindow = new google.maps.InfoWindow({
      content : "<div class='infowindow'>You are awesome</div>"
});
.
.

Now that we have created our infowindow, running this code as is … well, won’t work yet. The reason is this: we have to connect the marker with our infowindow. How do we do that? Thanks to Google Maps APIs, we have google.maps.event.addListener() method to the rescue. This method takes three arguments ( the object it is attached to, the event it should listen for and the function (event handler) to call when the event is triggered.

Before I show you the code, it would be clear to mention that the InfoWindow object has a method called open() which takes two arguments – map: this is a reference to the map it will be added to(in case you have more than 1 map) and the second argument is the object that the   InfoWindow will attach itself to. In our case, we want to attach it to the marker being clicked!

Now code:

.
.
//added a class for styling the window
var infowindow = new google.maps.InfoWindow({
      content : "<div class='infowindow'>You are awesome</div>"
});

//add event listener
google.maps.event.addListener(marker, 'click', function(){
      infowindow.open(map, marker);
});
.
.

Here is how it looks in action:

google-maps-api-infowindow

That icon is called abduction. You can also see the shadow! Awesome.

More Markers – markersville

The question you might have asked yourself is this: how do I add more than one marker to my map without manually creating them? One thing I have assumed all along is that you are familiar with JavaScript and with that in mind, using a for loop and an array sounds like a good idea!

More United States Cities on the Map

I am going to show you the entire piece of code that does several things: (i) add markers (ii) add infowindows and (iii) eliminate duplicate windows. It will make much sense once I explain it.

(function () {
    window.onload = function () {
        var mapDiv = document.getElementById('map');

        var options = {
            zoom: 3,
            center: new google.maps.LatLng(37.09, -95.71),
            mapTypeId: google.maps.MapTypeId.ROADMAP
        };
        var map = new google.maps.Map(mapDiv, options);

        var cities = [];
        cities.push(new google.maps.LatLng(40.756, -73.986));
        cities.push(new google.maps.LatLng(37.775, -122.419));
        cities.push(new google.maps.LatLng(47.620, -122.347));

        var infowindow;
        for (var i = 0; i<cities.length; i++) {
            //create markers for each city
            var marker = new google.maps.Marker({
                position: cities[i],
                map: map,
                title: "City Number " + i
            });

            (function (i, marker) {
                //create even listeners (closures at work)
                google.maps.event.addListener(marker, 'click', function () {
                    if (!infowindow) {
                        var infowindow = new google.maps.InfoWindow();
                    }
                    //set content
                    infowindow.setContent('City number ' + i);
                    //open the window
                    infowindow.open(map, marker);
                });
            })(i, marker);
        }
    };
})();

Three markers:
google-maps-api-more
Clicking on any of the markers results in the following:

google-maps-apis-final

Everything up until line 11 should be second nature to you by now, I hope. Now, at line 12…15, I simply defined an array and added three cities to it.

On line 17 – I defined a variable infowindow which will come in handy when we want to avoid duplicating info windows by checking if one already exists.

On line 18…24 – I use a for loop to create markers and from

Line 26…37 – I used an anonymous function within the for loop to add event listeners to each of the markers. Everything within the anonymous function is much like what we have been doing all along – creating an info window, setting the content and finally opening it when a marker is clicked.

I am using closures here to avoid a situation where no matter which marker you click, the infowindow will open for the marker that was created last(always ‘infowindow number 3’). You can read more about closures by visiting Douglas Crockford’s Post .

I am going to stop here because I think this is long enough. I will do more fun stuff next time. If you notice any errors, please notify me and I will fix them as soon as possible. If you have any questions please let me know through the comments section. Hopefully this taught you something meaningful. Thank you for stopping by.

Programming With Google Maps APIs – Part III

Hello! Thanks for stopping by. I didn’t post anything yesterday because I was asked to read and review an AngularJS Starter book which ended up taking all my time. It was a good experience because I learned some new stuff. That being said, today, I am going to continue with our Google Maps APIs series. My last post  ended with the code below and so let us pick up from there:

(function () {
    window.onload = function () {
        var mapDiv = document.getElementById('map');
        var latlng = new google.maps.LatLng(37.09, -95.71);

        var options = {
            center: latlng,
            zoom: 4,
            mapTypeId: google.maps.MapTypeId.ROADMAP,
            mapTypeControl: true,
            mapTypeControlOptions : {
                style: google.maps.MapTypeControlStyle.DROPDOWN_MENU,
                position : google.maps.ControlPosition.TOP,
                mapTypeIds :
                    [ google.maps.MapTypeId.ROADMAP,
                      google.maps.MapTypeId.SATELLITE ]
            }
        };
        var map = new google.maps.Map(mapDiv, options);
    };
})();

navigationControl

This property displays or hides the navigation control. That is the control that typically resides in the upper-left side of the map with which you can zoom and sometimes pan the map.

Code Example:

.
.
 var options = {
            center: latlng,
            zoom: 4,
            mapTypeId: google.maps.MapTypeId.ROADMAP,
            disableDefaultUI: true,
            navigationControl:true //here
        };
.
.

navigationControlOptions

With the navigationControlOptions property, you determine the look of the navigationControl. It pretty much works like mapTypeControlOptions by taking an object as its value. The object is of type: google.maps.NavigationControlOptions and it has two properties : position and style. It might sound familiar if you read my first two posts.

  1. position – this property is of type google.maps.ControlPosition.
  2. style – this property comes in several flavors and they all reside in google.maps.NavigationControlStyle. They are :
  • DEFAULT – if set to this value, the control will vary according to the map size and other factors. It displays either small or large.
  • SMALL – this is, well, the small control. Only allows you to zoom the map.
  • ANDROID – android anybody? This control is specifically tailored for android smartphones.
  • ZOOM_PAN – this is the large control that lets you to both zoom and pan the map.

Code Example:

.//using both position:TOP_RIGHT and style:ZOOM_PAN
.
var options = {
            center: latlng,
            zoom: 4,
            mapTypeId: google.maps.MapTypeId.ROADMAP,
            disableDefaultUI: true,
            navigationControl:true,
            navigationControlOptions :{
                position: google.maps.ControlPosition.TOP_RIGHT,
                style: google.maps.NavigationControlStyle.ZOOM_PAN
            }
        };
.
.

This is how the map will look like with the code above:

google-maps-api-3

As you can see, the position is top-right and the style is zoom_pan meaning you can do both zooming and panning of the map. In order to use the above property, you must set navigationControl to true.

scaleControl

This property determines whether the scale control will be displayed or hidden. The default value is false meaning it is not displayed. If you want to show it on your map, you must set it to true.

.
.
var options = {
    zoom: 8,
    .
    .
    scaleControl: true //this line
};

scaleControlOptions – Using this property, you control how scaleControl will be displayed. It takes an object of type google.maps.ScaleControlOptions. Just like NavigationControlOptions, it has two properties: guessed them yet? Position and Style. In order to use scaleControlOptions, you must also use and set scaleControl to true. (Sounds familiar right?).

keyboardShortcuts

This property enables or disables the ability to use the keyboard to navigate the map. It is true by default but you can change it to false to disable it.

disableDoubleClickZoom

Double-clicking on a map normally zooms in but if you want to disable that property, you set disableDoubleClickZoom to true.

draggable

You can pan the map by default by simply dragging it around. If for some personal reason you would like to disable it, set draggable to false.

scrollwheel

You can use this property to decide whether you want to use your mouse to zoom in and out by simply scrolling the wheel of your mouse. It is set to true by default. You can, for some alien reason, set it to false to disable it.

streetViewControl

This property shows or hides the Street View Control (wildly known as pegman). The default value of this property is false. You can set it to true to enable it. If you set the value to true, the map will display an orange pegman right above the zoom control.

Combined Code Example:

.
.
var options = {
            center: latlng,
            zoom: 4,
            mapTypeId: google.maps.MapTypeId.ROADMAP,
            disableDefaultUI: true,
            navigationControl:true,
            keyboardShortcuts: false,
            disableDoubleClickZoom: true,
            draggable: false,
            streetViewControl: true,
            navigationControlOptions :{
                position: google.maps.ControlPosition.TOP_RIGHT,
                style: google.maps.NavigationControlStyle.ZOOM_PAN
            }
        };
        var map = new google.maps.Map(mapDiv, options);
.
.

Before I finish this post for today, I would like to show you a snapshot of our final map with the above code:

google-maps-api-controls
I used squares and rectangles to indicate the controls and their positions. You might be curious to know what really happens when you drag the pegman around! This is what happened when I dragged it to some street in Kansas! It switched to Street View mode – Warning: you might see someone you know, seriously, you might!
google-maps-api-kansas
I told you it was pretty clear you might actually see your friend sneaking around. The good part, ‘we are not in Kansas anymore’.

Thanks again for stopping by and I hope you learned something from this post. Next time I will jump into Controlling the Map Container – the html div element that contains our map, then some more cool and fun stuff. If you spot an error, please let me know. Please share this post if you like it. ‘See you’ soon and take care of yourself!

How To Install Pik and Run Commands on Git Bash – Ruby

A few weeks or so ago, I was learning Ruby on Rails and I couldn’t avoid running into the version control issue with Ruby. Consider a situation where you are running Ruby 1.93 but you want to write code that works with a different version of Ruby like Ruby 2.00. The solution is to perhaps install more than one version right? Now after installing more than one version, you might be wondering how to switch from one version to another. That is why I am doing this tutorial.

This tutorial is meant for Windows computers! The idea is to install a ruby version manager for Windows. People using Macs might be familiar with something called rvm for … you guessed it … ruby version manager. People using windows however, have pik and it is totally free to download and use. So, without much ado, here is the video tutorial I created to make things easier. It is complete with examples.

So, there you have it. I hope it helped you and if you run into any problem, do not hesitate to ask because I will be more than happy to help.

Please remember to subscribe if you like what you see here. Thanks for stopping by and please leave me some comments.

Stay safe and see you soon!

FREE Book Download From Amazon (True Story)

Hello! I apologize for taking a little too long to post something! I have been doing certain things (other side projects) and following the progress of my country’s election [Kenya]. I hope everything is going good for you.

Today(starting Wednesday 3/6/2013), I am going to give my book away for FREE on Amazon. I have been waiting for this for a while now and I figured I should do it now and then extend my reach to other platforms like smashwords and Barnes and Noble. So here is what I am going to do:

If you own a kindle tablet, an android tablet, a smart phone, or any other type of gadget that accepts applications, then you are all set. Oh, wait, I have to also mention the fact that you need an appetite for true stories (like the nearly 10,000 others who have read the book already). I normally tell people to read the reviews first: like these two I grabbed from Amazon:

my-free-book-giveaway

You can also read more reviews by visiting my Amazon page before making your decision.

When you are done reading the reviews, you can grab your copy by downloading it to your device (including your computer if you don’t own the above mentioned tablets). Here is the snapshot of the book:

my-life-sentences-free-book

You can download the book by clicking on the above image or using this download link:

Download My Life Sentences – A True Story for Free Today

If you run into problems while trying to do this, please notify me and I will be more than happy to help you. If you would like to share a link on Facebook or any other social media that you use, please know that I will truly appreciate. That is all am going to say for today. I hope you find this book inspiring.

Thank you!

Object-oriented Programming In PHP – Part II

Yesterday I created a post on OOP and had to split it in two to avoid making it too long. Today, I am going to finish up the remaining part before starting other stuff! So, let us get started here.

object-oriented-programming

Controlling Visibility Through Inheritance With private and protected

While writing code using OOP, you can use private and protected visibility modifiers to control what gets inherited. Attributes or methods declared as private will not be inherited. If an attribute or a method is marked as protected, it will not be visible outside the class (like private) but will be inherited. Example:

<?php
   class A
   {
     private function operation1(){
       echo 'operation1 was called';
     }
     protected function operation2(){
       echo 'operation2 was called';
     }
     public function operation3(){
       echo 'operation3 was called';
     }
   }

   class B extends A
   {
     function __construct(){
       $this->operation1();
       $this->operation2();
       $this->operation3();
     }
   }

   $b = new B();

   #----------------------------------------------------#
   |The above code creates a class A with three methods |
   |with private, protected and public accessibility    |
   |As I mentioned earlier, private attributes and      |
   |methods are not inherited - that means that operat- |
   |ion1() will result in an error when you call class B|
   |constructor                                         |

   |Fatal error: Call to private method A::operation1() |
   |from context 'B'                                    |
   #----------------------------------------------------#

   #The protected operation2() can only be used inside  #
   #the child class but not outside. That being said,   #

   $b->operation2();

   #will result in an error!
   #public operation3() however will not result in any  #
   #error
   $b->operation3();

?>

Overriding

We have shown that a subclass can declare new attributes and methods. It is also valid and sometimes useful to re-declare the same attributes and operations. You might do it to give an attribute in the subclass a different default value to the same attribute in its superclass or to give an operation in the subclass a different functionality to the same operation in its superclass. This is called overriding.

Consider:

<?php
   class A
   {
     public $attribute = "default value";
     function operation(){
       echo "Something <br />";
       echo "The value of \$attribute is ".$this->attribute."<br />";
     }
   }

   #Now if you want to alter the default value of $attribute
   #and provide new functionality to operation() you can create
   #the class B that inherits from A like this:

   class B extends A
   {
     public $attribute = "different value";
     function operation(){
       echo "Something else<br />";
       echo "The value of \$attribute is ".$this->attribute."<br />";
     }
   }

   #Declaring B does not affect the original declaration of A
   #Now see what happens here:

   $a = new A();
   $a->operation();
   #----------------------RESULT----------------------#
   #Something
   #The value of $attribute is default value
   #---------------------Now create one for B---------#

   $b = new B();
   $b->operation();
   #---------------------RESULT-----------------------#
   #Something else
   #The value of $attribute is different value

   #NOTE: overriding attributes and operations in a
   #subclass does not
   #affect the superclass

   #The parent keyword allows you to call the original version
   #of the operation in the parent class. To call A::operation()
   #in class B, you simply do this:
   parent::operation();
?>

Preventing Inheritance and Overriding with final

In PHP, using the keyword final in front of a function prevents it from being overridden in any subclasses. For instance, we could add it to our operation in our class A like this:

<?php
   class A
   {
     public $attribute = "default value";
     final function operation(){
       echo "Something <br />";
       echo "The value of \$attribute is ".$this->attribute."<br />";
     }
   }
   #-------------------------------------------------------#
   #using final prevents you from overriding operation in class
   #B and an attempt to do so will result in a fatal error!
   #Fatal error: Cannot override final method A::operation()

   #You can also use final to prevent a class from being
   #subclassed like so:

   final class A
   {
     //--------------
   }
   #Trying to inherit from A now will result in an error message:
   #Fatal error: Class B may not inherit from final class (A)
?>

Understanding Multiple Inheritance

PHP does not support multiple inheritance – that means each class can only inherit from one parent. There is however no restriction on how many children can share the same parent.

Implementing Interfaces

Since PHP does not support multiple inheritance, you use interfaces to solve problems that would otherwise require multiple inheritance. The idea of an interface is that it specifies a set of functions that must be implemented in classes that implement the particular interface.

Consider a situation where you have a set of classes that you want them to be able to display themselves. Instead of having a parent class with a display() method that they all inherit and override, you can simply implement an interface as follows:

<?php
   interface Displayable
   {
      function display();
   }

   class webPage implements Displayable
   {
     function display(){
       //do some display work here for web page
     }
   }

   #Failure to implement the display() function will result
   #in a fatal error. It is also worth mentioning that
   #a class can inherit from one class and implement more than
   #one interface!
?>

Designing Classes

When I was working on my simple shopping cart, I used some include() or require() to maintain consistency throughout the pages. Now that we know what classes and functions do, we should be able to generate our web pages dynamically!

That will be really fun and that is why I want to save it for tomorrow to avoid diluting it with what I have already done today! I hope you will join me for this fun adventure because it will be so much fun.

Thanks for stopping by and if you have any questions or have spotted any errors, let me know. Take care and see you!

Writing Your Own Functions – PHP

Functions exist in most programming languages and they separate code that performs a single well-defined task. This makes it easier to read and reuse the code. A function is a self-contained module of code that prescribes a calling interface, performs some task and optionally returns a result.

There are several reasons to write your own functions in PHP; for instance if you want to perform a task that other built-in functions cannot help you do. Let us quickly look at an example of a function call before we do function definition.

<?php
  #call a function in php
  function_name();

  #this line calls a function named function_name that does not
  #require parameters. This line also ignores any possible values
  #that might be returned by the function.

  #You might have come across phpinfo() function used to test
  #php version, information about php, the web server setup etc
  #it takes no parameters:
  phpinfo();
?>

Most functions however do require a parameter or more – which are the inputs to the functions. If a function expects a parameter to be passed, you can either pass in the exact value or a variable containing the value. Let us see an example

<?php
   #this function expects 1 parameter (string):
   function_name('parameter');

   #this function expects a number:
   function_name(2);

   #we use a variable as a parameter here
   function_name($age);

   #Consider fopen() function's prototype here:
   resource fopen(string filename, string mode
                    [, bool use_include_path [, resource context]]);

   #The above prototype tells you several things: resource word tells
   #you that the function fopen() returns a resource(an open file
   #handle). The function parameters are inside the parentheses:
   #filename & mode are both strings and then bool use_include_path
   # and lastly
   #context which is of type resource!

?>

The square brackets around use_include_path and context indicate that these parameters are optional.That means you can choose to provide values for optional parameters or you can ignore them in which case the default values will be used. Note that for functions with more than one optional parameter, you can only leave out parameters from the right. In our example, you can leave out context or both use_include_path and context but you cannot leave out use_include_path and provide context.

Knowing the above prototype therefore makes it easier to understand the code below as valid:

<?php
   $name = 'myfile.txt';
   $openmode = 'r';
   $fp = fopen($name, $openmode);

  #the above line calls fopen() passing in $name and $openmode
  #whatever is returned is stored in $fp variable
?>

One common mistake among new php users is calling a function that is not defined. If you do that, you will get an error message! Always check to see if your functions are spelled correctly during definition and check to see if the function exists in the version of PHP you are using.

You might not always remember how the function names are spelled. For instance, some two-word functions have an underscore between the words and some don’t. The function stripslashes() runs the two words together while strip_tags() separates the two words with an underscore.

You will also get an error message if you try to call a function that is part of a PHP extension that is not loaded. It is a good thing to name your functions with lowercase for consistency.

The cool thing about programming languages is the ability to write your own functions. You are not limited to using built-in php functions!

Basic Function Structure in PHP

A function definition starts with the keyword function and then followed by a name, then the parameters required and contains the code to be executed each time this function is called:

<?php
   #define a function
   function my_function(){
      echo 'Hello, my function was called';
   }

   #we can now call our function as follows:
   my_function();   #you can guess the output!

   #built-in functions are available to all php scripts but
   #your declared functions are only available to the scripts
   #in which they were declared. It is a good idea to have a file
   #or set of files containing your commonly used functions. You
   #can then use require() to make them available to your scripts.
?>

Naming Functions In PHP

The main point to consider while naming your functions is; short but descriptive. Consider a page header function – pageheader() or page_header() sound pretty good! There are restrictions to follow:

  • Your function cannot have the same name as an existing function.
  • Your function name can only contain letters, digits and underscores.
  • Your function name cannot begin with a digit.

As opposed to other languages, function overloading – the feature that allows you to reuse function names, in PHP is not supported.

<?php
   //examples of valid function names
   name()
   name2()
   name_three()
   _namefour()

   //examples of invalid function names
   5name()
   name-six()
   fopen()   #this could be valid if it didn't already exist!

?>

Using Parameters In Functions

<?php
   function create_table($data) {
      echo "<table border=\"1\">";
      reset($data); // Remember this is used to point to the beginning
      $value = current($data);
      while ($value) {
         echo "<tr><td>".$value."</td></tr>\n";
         $value = next($data);
      }
      echo "</table>";
   }

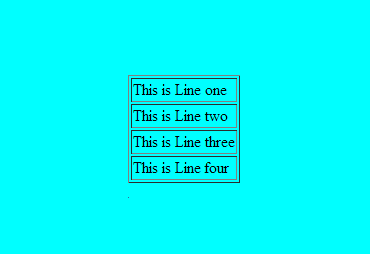
   #You can call create_table($data) by passing in values like this:
   $my_array = array('This is Line one', 'This is Line two',
                     'This is Line three', 'This is Line four');
   create_table($my_array);

?>

If you run that simple code, you will get:
functions-testing

Just like built-in functions, your functions can have no parameters, one parameter or more than one parameter. Let us improve our above function to include some optional parameters:

<?php
   #allow the caller to set the border width, cellspacing and
   #cellpadding:
   function create_table2($data, $border=1,
                         $cellpadding=4, $cellspacing=4 ) {
      echo "<table border=\"".$border."\"
                        cellpadding=\"".$cellpadding."\"
                        cellspacing=\"".$cellspacing."\">";
      reset($data);
      $value = current($data);
      while ($value) {
         echo "<tr><td>".$value."</td></tr>\n";
         $value = next($data);
      }
   echo "</table>";
   }

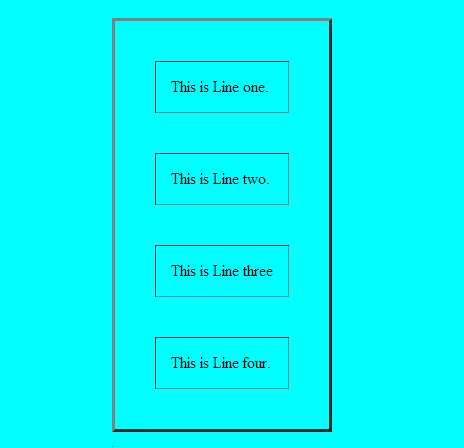
   #Now let us call our function passing in the parameters
   $my_array = array('This is Line one.','This is Line two.',
                     'This is Line three', 'This is Line four.');
   create_table2($my_array, 3, 8, 8);
?>

If we run the above code, we get a much better table because we can adjust the parameter values as we wish. If we don’t supply them, the default values are used! This is what we get on the browser.
better-function

Understanding Scope

A variable scope controls where that variable is visible and usable. Below are the simple rules in PHP to follow:

  1. Variables declared inside a function are in scope from the statement in which they are declared to the closing brace at the end of the function. This is called function scope. These are called local variables.
  2. Variables declared outside functions are in scope from the statement in which they are declared to the end of the file but not inside functions. This is called global scope. These variables are called global variables.
  3. The special superglobal variables are visible both inside and outside functions.
  4. Using require() and include() statements does not affect scope. If the statement is used inside a function, the function scope applies. If it is not inside a function, the global scope applies.
  5. The keyword global can be used to manually specify that a variable defined or used inside a function will have a global scope.
  6. Variables can be manually deleted by calling unset($variable_name) .A variable is no longer in scope if it has been unset.

Example of scoping:

<?php
   #declare a function and a variable inside it
   function fn(){
      $var = "contents";
   }

   #the $var variable declared inside our fn() function has function
   #scope.
   fn();
   #Trying to refer to $var outside our fn() function will create a
   #new $var variable with global scope.It will be visible till the
   #end of the file. Using $var with just echo will return nothing
   #because it has no value at the moment.
   echo $var;

   #The inverse of the above example:
   function fn(){
      echo "inside the function, \$var = ".$var. "<br />";
      $var = 'contents 2';
      echo "inside the function, \$var = ".$var. "<br />";
   }
   $var = 'contents 1';
   fn();
   echo "outside the function, \$var = ".$var. "<br />";

   #-----------------OUTPUT-------------------------------#
   #inside the function, $var =
   #inside the function, $var = contents 2
   #outside the function, $var = contents 1

   #If you want to create a global variable inside a function,
   #you simply use the global keyword (global $my_variable)

?>

Pass By Reference vs. Pass by Value
Let us consider a simple function increment()

<?php
   function increment($value, $amount = 1) {
      $value = $value +$amount;
   }

   $value = 10;
   increment($value);
   echo $value    # 10 - no change

  #-----------------------------Solution-------------------------#

  function increment(&$value, $amount = 1) {
     $value = $value +$amount;
  }

  $a = 10;
  echo $a;   #10
  increment($a);
  echo $a;  #11

  #Explanation:
  #-------------by value -----------------------#
  #If you pass by value, a new variable is created containing the
  #value passed in. It is a copy of the original. Modifying this new
  #variable does not change the original value.

  #----by reference-----------------------------#
  #Instead of creating a new variable, the function receives a
  #reference to the original variable.This reference has a variable
  #name starting with a $ sign and can be used like any other
  #variable. Modifying this reference variable affects the original
  #variable.
  #You specify a pass by reference parameter by using an ampersand(&)
  #before the parameter name in the function definition.
?>

Using The return keyword:

The keyword return ends the execution of a function. Execution of a function ends either after all statements have been executed or the return keyword is used. Consider this example:

<?php
    function test_return() {
       echo "This statement will be executed";
       return;
       echo "This statement will never be executed";
    }
    #Calling the above function will cause the first echo
    #statement to be executed and not the second one!
?>

The above example is obviously not the best way to use return keyword. Normally, you want to use it while checking for some conditions being met or not. Let us see a simple example here:

<?php
    function larger( $x, $y ) {
       if ((!isset($x)) || (!isset($y))) {
            echo "This function requires two numbers.";
            return;
       }
       if ($x>=$y) {
           echo $x."<br/">;
       } else {
           echo $y."<br/">;
       }
   }
   #testing the function
   $a = 1;
   $b = 2.5;
   $c = 1.9;
   larger($a, $b);
   larger($c, $a);
   larger($d, $a);
   #The output is as follows:
   2.5
   1.9
   This function requires two numbers

?>

Returning values from functions
You can simply return values directly from functions as follows:

<?php
   #modified version of larger that use return
   #instead of echo to return the value
   function larger ($x, $y) {
      if ((!isset($x)) || {!isset($y))) {
         return false;
      } else if ($x>=$y) {
         return $x;
      } else {
         return $y;
      }
   }
   #--------------sample test code--------------#
   $a = 1; $b = 2.5; $c = 1.9;
   echo larger($a, $b).’<br />’;
   echo larger($c, $a).’<br />’;
   echo larger($d, $a).’<br />’;

   2.5
   1.9
   #--------------------------------------------#
?>

Implementing Recursion in PHP
Recursion is supported in PHP. A recursive function is a function that calls itself. They are more useful when navigating dynamic data structures such as linked lists and trees. Example:

<?php
   #----------recursive approach-------------#
   function reverse_r($str) {
      if (strlen($str)>0) {
         reverse_r(substr($str, 1));
      }
      echo substr($str, 0, 1);
      return;
   }

   #------------iterative approach-----------#
   function reverse_i($str) {
       for ($i=1; $i<=strlen($str); $i++) {
           echo substr($str, -$i, 1);
       }
       return;
   }

    reverse_r('Hello');
    reverse_i('Hello');

    #calling reverse_r('Hello') will call itself a number of times,
    #with the following parameters:

    reverse_r(‘ello’);
    reverse_r(‘llo’);
    reverse_r(‘lo’);
    reverse_r(‘o’);
    reverse_r(‘’);

?>

The above functions  do the same thing but using recursive and iterative approaches respectively.
With each iterative call in the first function, the length of the string is tested. When you reach the end where strlen($string) == 0, the test fails. One issue with recursion is the memory use. It is up to you to decide which approach fits your taste.

As I end this post, I would like to direct you to PHP documentations where you can find out more. Thanks for stopping by and I hope you found some useful information here. If you have any questions, please let me know through the comments section. If you spot any errors, please let me know as well.

Quora, Mozilla, Smarterer – My 3 Friends

Hello! Today, am just going to step a side(from code) and share with you some of the coolest things I have in my pocket! First of all, let us both agree that the web is too big to beat and you could spend the rest of your life roaming around in search for the right information!

quora-smarterer-blogging

I don’t know about you but I face information overload quite often and I end up not getting the answers to my questions even though I have the whole day to sit in front a computer. You are probably thinking, ‘what about just opening a browser and typing some key words into Google ?’ Yeah, trust me, you can do that and still find nothing useful.

Quite honestly, I think Google is doing a great job bringing us information when we really need it. But what do you do when nothing seems to work? You don’t have a friend to call and ask a question, you are too scared to ask your co-worker a private question, and the list goes on and on. Well, don’t sweat it! I have a recommendation for you! Quora!

Quora is not your typical website. You might say, well, Facebook is cool too or Google+ or even Twitter but you could be in for a big surprise! What I feel sets Quora a side is the quality of the information. Again, you might argue otherwise – this is my opinion. The idea that a company could be started, made available for FREE of charge and enable people from all walks of life to ask questions of all types and get answers from the smartest in their fields is just AMAZING. If that does not appeal to you, I have no clue what will.

Are you already asking yourself why I am praising Quora so much? The good thing is this; I have no affiliation whatsoever – I just like giving credit where it is due. You convince me that you are worth it and I say ‘good job kid’. The opposite is true.

So, I will make this post as short as possible so that you can visit Quora and take a look if you have not already been there! Good luck and if you have any ideas, great sites like Quora, please do not hesitate to share with me and the rest of my awesome readers.

Note: If you are teaching yourself how to code or just want to keep your skills up to date, I recommend checking out Mozilla P2PU Challenges and then hop on over to Smaterer where you can test your skills through a series of tests! You will love it.

Thanks for stopping by and remember to drop me a line and if you like what I post here, please subscribe!