Tag Archives: challenges

I Just Moved – A Friendly Reminder

moving-wordpress-blog

I am creating this post to let you know that I have started the process of migrating from this wordpress-hosted blog to a self-hosted one which is located at, well, Simple Developer. I am still fixing a few errors like syntax highlighting and things like that.

Besides that, everything should be fine now. I humbly request those who had subscribed to this blog to consider subscribing to my new blog which is still a wordpress platform.

Thank you for your loyalty as readers and I hope we can connect with each other as time as goes by.

Take care and see you at http://www.simpledeveloper.com !

Programming With Google Maps APIs – Part VI

Hello! Nice to see you and thanks for stopping by. In the last two days I took a detour from programming but today I am going to pick up from where I left Google Maps APIs – Part V . Today’s post will be relatively shorter than previous ones because I am completing a section (at the end, I will give an app idea). Let us get to it. We should start with our previous finishing code:

(function () {
    window.onload = function () {
        var mapDiv = document.getElementById('map');

        var options = {
            zoom: 3,
            center: new google.maps.LatLng(37.09, -95.71),
            mapTypeId: google.maps.MapTypeId.ROADMAP
        };
        var map = new google.maps.Map(mapDiv, options);

        var cities = [];
        cities.push(new google.maps.LatLng(40.756, -73.986));
        cities.push(new google.maps.LatLng(37.775, -122.419));
        cities.push(new google.maps.LatLng(47.620, -122.347));

        var infowindow;
        for (var i = 0; i<cities.length; i++) {
            //create markers for each city
            var marker = new google.maps.Marker({
                position: cities[i],
                map: map,
                title: "City Number " + i
            });

            (function (i, marker) {
                //create even listeners (closures at work)
                google.maps.event.addListener(marker, 'click', function () {
                    if (!infowindow) {
                        infowindow = new google.maps.InfoWindow();
                    }
                    //set content
                    infowindow.setContent('City number ' + i);
                    //open the window
                    infowindow.open(map, marker);
                });
            })(i, marker);
        }
    };
})();

Automatically adjusting the viewport to fit all markers

Every time you are expecting dynamic data to be added to your map (markers), you want to make sure that none of them appears outside the map. The best way to handle this is by making a map that automatically adjusts to the markers added. In order to achieve that, we use LatLngBounds object.

LatLngBounds Object

A bounding box is simply a rectangle defining an area. Its corners consist of geographical coordinates and everything inside it is within its bounds.  You can use it to calculate the viewport of a map and also determine if an object is in a certain area of the map.

The bounding box is of type google.maps.LatLngBounds object. It takes two optional arguments (southwest and northeast corners of the rectangle). Those arguments are of type google.maps.LatLng. 

In order to manually create a LatLngBounds box, we have to determine the coordinates  of its corners(you will see a better solution soon). Adding to our previous code, just below the line where we created our map, we could do this:

.
.
   var map = new google.maps.Map(mapDiv, options);
   var bounds = google.maps.LatLngBounds(
           new google.maps.LatLng(37.775, -122.419),
           new google.maps.LatLng(47.620, -73.986)
   );
.
.
.

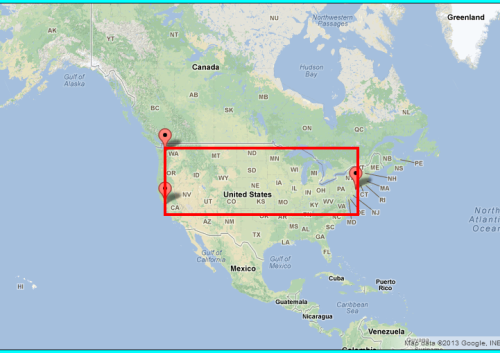
Now our three markers will be within the above coordinates: Here is what am trying to allude to.

google-maps-bounds

Using The APIs For The Heavy Work

In order to extend our example to automatically adjust the viewport to fit the markers, we have established that we need a LatLngBounds object. So, we first create an empty LatLngBounds object somewhere outside our for loop. 

.
.
.
        var infowindow;
        //creating our bounds here
        var bounds = google.maps.LatLngBounds();

        for (var i = 0; i < cities.length; i++) {
            //create markers for each city
            var marker = new google.maps.Marker({
                position: cities[i],
                map: map,
                title: "City Number " + i
            });

.
.
.

After creating our empty bounds, we are going to extend it with each marker added to the map. We do this inside the loop like this:

.
.
.
      for (var i = 0; i < cities.length; i++) {
          [...]

          //extend the bounds here
          bounds.extend(cities[i]);
      }
.
.
.

At last, after iterating through the markers, we are going to adjust our map using fitBounds() method of the map object.

[...]
    window.onload = function () {
        [...]
        var map = new google.maps.Map(mapDiv, options);

        [...]

   //Adjusting the map to the bounding box
   map.fitBounds(bounds);
}

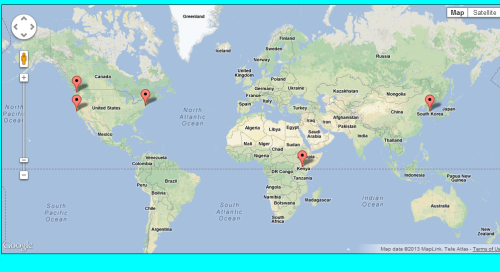
That is it for the above case. We now have a map that fits all the markers perfectly inside the viewport. In fact, you can now add more cities and the map will automatically adjust the viewport. Oh wait, we can do this right now by adding my favorite city: Nairobi, Kenya and let us also represent Asia (seoul, South Korea – let there be peace in the peninsula).

[...]
        [...]
        [...]

        var cities = [];
        cities.push(new google.maps.LatLng(40.756, -73.986));
        cities.push(new google.maps.LatLng(37.775, -122.419));
        cities.push(new google.maps.LatLng(47.620, -122.347));
        cities.push(new google.maps.LatLng(1.2833, 36.8167));
        cities.push(new google.maps.LatLng(37.5833, 127.0000));

        [...]
  [...]

[...]

That should do it and now we can take a look at our awesome map with more markers.

google-maps-api-viewport-scale
There you have it! I hope you had some fun playing around with this example. Within a very short time and few lines of code, we have created a map that shows different cities displayed using markers. Now consider having users enter their cities as you watch the markers increase. I like this so much am starting to think of a cool app.

Let me show you the entire code then give you a cooler idea of an app!

(function () {
    window.onload = function () {
        var mapDiv = document.getElementById('map');

        var options = {
            zoom: 3,
            center: new google.maps.LatLng(37.09, -95.71),
            mapTypeId: google.maps.MapTypeId.ROADMAP
        };
        var map = new google.maps.Map(mapDiv, options);
        var bounds = new google.maps.LatLngBounds();

        var cities = [];
        cities.push(new google.maps.LatLng(40.756, -73.986));
        cities.push(new google.maps.LatLng(37.775, -122.419));
        cities.push(new google.maps.LatLng(47.620, -122.347));
        cities.push(new google.maps.LatLng(1.2833, 36.8167));
        cities.push(new google.maps.LatLng(37.5833, 127.0000));

        var infowindow;

        for (var i = 0; i < cities.length; i++) {
            //create markers for each city
            var marker = new google.maps.Marker({
                position: cities[i],
                map: map,
                title: "City Number " + i
            });

            (function (i, marker) {
                //create even listeners (closures at work)
                google.maps.event.addListener(marker, 'click', function () {
                    if (!infowindow) {
                        infowindow = new google.maps.InfoWindow();
                    }
                    //set content
                    infowindow.setContent('City number ' + i);
                    //open the window
                    infowindow.open(map, marker);
                });
            })(i, marker);
            //extend our bounds here
            bounds.extend(cities[i]);
        }
        map.fitBounds(bounds);
    };
})();

There you go. You can do whatever you want with it. Now here is an app idea (warning: it might sound silly).

Happy Places
The idea is simple. Use Twitter Search and Streaming APIs to track the use of a smiley face ):. It is not hard if you try. The fun part: using the user_ids of those who used the smiley face, fetch their locations (if they have set their location on their profiles) and check them against a local list of your own. If any of them match, put a marker on a map. It should be evident that more markers within a small city might indicate that residents there are friendly or happier but that is up for debate. Either way, it sounds fun. ):

See you soon. If you have questions, please ask. Take care and thanks for stopping by!

What To Do After College and Without a Job

So you just graduated or even lost your job and you are looking for a new one. Everywhere you look, you see bad news. Everybody seems to be smarter than you, more experienced and yet willing to take less pay for the gig. You have spent so much money running around mailing your resume. It is a messy world you say.

job-interviews

The fact is, it doesn’t get any easier. What do we do now, you ask?. I am not an expert but I will give you my 2 cents. Here are some of my favorite tricks that could get you going. NOTE:  A previous study showed that only 2 percent of professionals actually use their degrees. This means that just because you have a degree in business doesn’t necessarily mean you must work in that field.

  1. NETWORKING – I list this as the first thing to do for a reason. You are more likely to get a job through referral than other means. If there is something students in college should be doing besides studying and partying, it is making connections. Save those contacts because you will need them later. If you didn’t do so, you can still catch up by using LinkedIn and other social networks. Attend local events where you will meet new people with similar interests. There is more to networking than this short description but you get the idea.
  2. VOLUNTEER – Volunteering is not easy especially when you have bills to pay. I say this because when I refer to being a volunteer, it simply means you are offering your services for FREE. The benefits sometimes outweigh the effort. How? One thing you can do while applying for a job is mention the fact that you volunteered at company A or B. Good Karma. It is better to volunteer than to sit on your couch watching reality television and eating chips. So, find a local charity or a company that could benefit from your skills. Heck, you might even get hired if they think you are worth it.
  3. JOB-SEARCH – Oh wait a minute, I am already doing this right? I totally agree with you here but I wanted to say something more specific. It is tempting to blame the economy for lack of jobs especially when you have no idea where to look. One advice I was given by someone was that when it comes to job hunting, you should make the search a full time job. The only difference is that you don’t get paid, in fact, you spend your own money running around from office to office. Warning: Do not do this: ‘You do so many interviews, when you reach your 40th interview, you ask your interviewer the name of his company! ‘ Got it? I must mention also that you can do networking and volunteering as you job search.
  4. START A BUSINESS – If you have been trying to find a job for too long without any luck, perhaps you can start your own business in your garage. Of course this move is tricky and sometimes expensive to take. Perhaps you have identified a market gab and you feel like you can help fill it. You might be a software developer and you have a great product that could revolutionize the way people do things. With today’s world, opportunities are vast but you have to work hard and smart for it. Depending on your area of expertise, I promise, there is something out there that you can do to make extra cash. Since starting a business requires some capital, you might consider looking for professional advice on how to get started.
  5. JOIN oDESK – This is just one place where you can keep your skills sharp by doing freelance work. There are thousands of people out there looking for people like you to help them get their jobs done. You might not be paid much but you will get to build connections that could lead to greater opportunities down the road. Did I mention creating a portfolio? That will come in handy when applying for a job. You want to have something to show when your interviewer asks “what projects have you worked on before?” 
  6. JOIN QUORA – This is my favorite website. You might be wondering why I even listed it here. Let me cut it to the chase: if you want professional advice, links to the best resources that you would otherwise pay a lot of hard-earned money for, help others by answering questions in areas of your expertise, and most of all, meet awesome people – Quora is your friend. It is totally FREE of charge. Warning: You might get addicted to it and that could make your girlfriend, boyfriend or spouse really mad at you – in that situation, you can tell them to blame me for it.
  7. START A BLOG – This is obviously not for everyone. Most often, maintaining a blog is a challenging task especially if you don’t have a specific idea or subject to write about. From a horse’s mouth – before I started this blog four months ago, I tried blogging and failed several times. I thought people didn’t really like what I was posting. It is easy to talk about everything and end up talking about nothing. I advise you to find something specific that you are good at and get started. Set a schedule and you will be amazed by the experience. In fact, you might be surprised by your interviewer by asking you whether you have a blog or not!
  8. WRITE A BOOK – One amazing thing about life is that when one door closes, more than one door opens. In this case, ebook publishing is a door that leads to potential success. Let us be honest here, you have a story you would like to tell. There is a book in you. If I was able to write a book and self-publish it, reach more than eleven thousand (11,000) downloads on Amazon Kindle alone, then why can’t you do it?  It is amazing how things work. Give it a shot, starting with a few hundred words every day or weekend. Talk to me if you need help.
  9. EXERCISE + FOOD – I am not a food and fitness expert but we all know that you are better equipped when you are eating healthy and exercising. Just because you don’t have a job doesn’t mean you should let your cholesterol get out of control. Take care of your body. It is easier to get tempted when you don’t have enough money to eat junk food and I totally understand it. That does not mean you should give up the fight. Just do your best to remain healthy.
  10. MORE – The list goes on and on. However, I am going to stop here because I know you have other things to do. Go out there, make a clear plan of what you really want to do. Hire a resume service and get down to work (job searching of course). Prepare to be turned down several times. Never give up. If you have other ideas, please share them through the comments section.

At the end of the day, if you are lucky to be interviewed, be honest because it is not morally upright to lie. It is easier to be caught lying. Do whatever it takes to be ready for that job because you never know when you will be meeting your next employer. With that in mind, happy April Fools Day! I am not fooling you at this point. Good luck and see you soon.

The Big Questions That I ask Myself

Hello! I have decided to step a side today and post something outside programming. I have always fought the urges to act robotic by reminding myself that after all is said and done, I am indeed, a human being who has questions. I laugh really hard when tickled. I cry when hurt. I bleed when pricked. Most often, my questions never get answered.

life-big-questions

Today some people are celebrating Easter – and so “Happy Easter”. I say ‘some’ because there are those who don’t do it.

One of the biggest questions I have started asking myself is “what really happen to us when we die” and immediately after that question comes? “where do we really come from?”. Believe it or not, every time I hear people talk about the absence of a higher power, I don’t give them a dead ear – instead, I listen to what they have to say and then ask them “but how did everything happen to be?” I know some Physics and I obviously won’t start an endless discussion here on how there had to be a force that started the process of life.

What if we were not named “human beings?” I don’t really know. You might say that I could use some serious scientific reading and whatnot and I agree. However, every day I step outside my house and look around me, I see things that I can’t even explain. I see trees and rocks. I hear birds of prey singing. I am not blind to the fact that there is more to life than just what I can and cannot see.

Consider a rich guy who has worked so hard to be where he is today. The fact is that he has a right to drive the most expensive car as he pleases. He can live the best lifestyle(best here means he can buy whatever he wants). You can also look across the oceans or anywhere around the world and see poor children dying of hunger. The question is: can you really say the rich guy should take some of his money and help those poor kids? It would be a humane gesture but quite complicated. The reason is simple: you can argue for and against it. Most obviously he has a right to say no.

The other aspect of life is that perhaps if we worked a little harder, just an extra mile, we might feel satisfied with our lives. Make some extra dollars, live in a bigger house, make the best friends and have a perfect family. Most of us believe that we have to do all that in order to be happy. I don’t know about you but I would like to have a nice house and a car. Do I sound greedy? Perhaps but am not. Aren’t we advised to work really hard and earn stuff? What about those who have worked hard and yet they still cannot see success? Is it their fault? Are they lazy? Or maybe they don’t know how to define success!

I believe that most of us have focused so much on making a living, forgetting to make a life. Maybe we could have a fresh start by asking ourselves what we really want and need. We might be looking too far away instead of looking closer. Inside. The day we start to understand what we can do with what we already have, we will be happier than ever. It is not about having a lot of friends. It is about appreciating what I already have. Showing them that I care. Being human. It is not really hard. Start small.

I am going to stop here. Thank you for reading. I hope you have a good day. See you soon and you are welcome to leave a comment below this post. Always remember that it is not much to do with where we have come from, rather, it is where we are headed in this life. Stay safe and strong.

Programming With Google Maps APIs – Part V

Hello! I am back and I hope you are doing good today. At the end of my fourth Google Maps APIs  post, I mentioned in passing that I will be starting with Markers today and that is exactly where I will start. To make things fun, here is what a marker looks like – you have probably seen one if you have used a map before!

google-maps-api-marker

There you have it! So a marker is a small image that is positioned at a specific place on a map. Now we can figure out how to add it to our own map. We will start with a basic code for our map.

(function () {
    window.onload = function () {
        var mapDiv = document.getElementById('map');
        var latlng = new google.maps.LatLng(40.7257, -74.0047);

        var options = {
            zoom: 12,
            center: latlng,
            mapTypeId: google.maps.MapTypeId.ROADMAP
        };
        var map = new google.maps.Map(mapDiv, options);

    };
})();

Adding a Marker
You can choose to go with the default look of a marker or create your own. I will use the former in this example. A marker is of type google.maps.Marker object. This object takes one parameter which is of type google.maps.MarkerOptions . MarkerOptions has several properties that you can use to make the marker look and behave different but the basic two are: position and map.

position – this property defines the coordinates to place the marker and takes an argument of type google.maps.LatLng object.

map – the map property is a reference to the map to which you want to add the marker.

Example code for a marker

(function () {
    window.onload = function () {
        var mapDiv = document.getElementById('map');
        var latlng = new google.maps.LatLng(37.3700, -122.0400);

        var options = {
            zoom: 12,
            center: latlng,
            mapTypeId: google.maps.MapTypeId.ROADMAP
        };
        var map = new google.maps.Map(mapDiv, options);

        var marker = new google.maps.Marker({
            position : latlng,
            map : map
        });

    };
})();

There you have it. Oh wait, we have not seen it actually on a map yet. Here it is:
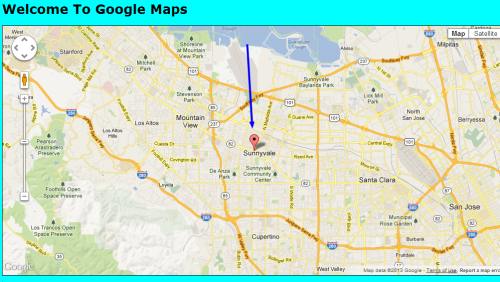
google-maps-api-markers

Adding a tooltip

We might both agree that adding a tooltip to our marker will make it much better. A tooltip is a yellow box with some text in it that appear when you hover your mouse over a marker. To add it to our marker, we simply use title property of the MarkerOptions object.

. //minimized code here from above
.
.
var map = new google.maps.Map(mapDiv, options);

var marker = new google.maps.Marker({
            position : latlng,
            map : map,
            title: 'Click Me Now'
});

One thing to note is that you are not limited to using the default marker icon. In fact, Google hosts a ton of other icons that you can freely use. In order to use a different icon, you provide a url location to it like this:

var marker = new google.maps.Marker({
             position: latlng,
             map: map,
             title: 'Click Me Please',
             icon : 'http://youricon-location.com'
});

Adding an InfoWindow

Normally when marking a place on a map, you might want to show more information related to that place. Google Maps APIs provides a way to do so using InfoWindow. It looks like a speech bubble and appears on top of a marker when you click it.

InfoWindow resides in the google.maps namespace. It takes one argument which is an object called InfoWindowOptions. Just like MarkerOptions object, InfoWindowOptions has several properties but the most important one is the content.  This property controls what will show inside the info window. It can be plain text, HTML or a reference to HTML node.

Code Example:

. //minimized code
. //save space
.
var map = new google.maps.Map(mapDiv, options);
var marker = new google.maps.Marker({
            position : latlng,
            map : map,
            title: 'Click Me Now'
});
//added a class for styling the window
var infowindow = new google.maps.InfoWindow({
      content : "<div class='infowindow'>You are awesome</div>"
});
.
.

Now that we have created our infowindow, running this code as is … well, won’t work yet. The reason is this: we have to connect the marker with our infowindow. How do we do that? Thanks to Google Maps APIs, we have google.maps.event.addListener() method to the rescue. This method takes three arguments ( the object it is attached to, the event it should listen for and the function (event handler) to call when the event is triggered.

Before I show you the code, it would be clear to mention that the InfoWindow object has a method called open() which takes two arguments – map: this is a reference to the map it will be added to(in case you have more than 1 map) and the second argument is the object that the   InfoWindow will attach itself to. In our case, we want to attach it to the marker being clicked!

Now code:

.
.
//added a class for styling the window
var infowindow = new google.maps.InfoWindow({
      content : "<div class='infowindow'>You are awesome</div>"
});

//add event listener
google.maps.event.addListener(marker, 'click', function(){
      infowindow.open(map, marker);
});
.
.

Here is how it looks in action:
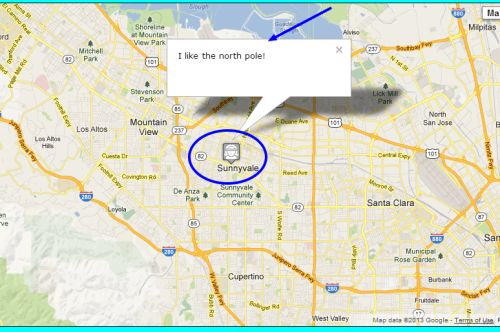
google-maps-api-infowindow

That icon is called abduction. You can also see the shadow! Awesome.

More Markers – markersville

The question you might have asked yourself is this: how do I add more than one marker to my map without manually creating them? One thing I have assumed all along is that you are familiar with JavaScript and with that in mind, using a for loop and an array sounds like a good idea!

More United States Cities on the Map

I am going to show you the entire piece of code that does several things: (i) add markers (ii) add infowindows and (iii) eliminate duplicate windows. It will make much sense once I explain it.

(function () {
    window.onload = function () {
        var mapDiv = document.getElementById('map');

        var options = {
            zoom: 3,
            center: new google.maps.LatLng(37.09, -95.71),
            mapTypeId: google.maps.MapTypeId.ROADMAP
        };
        var map = new google.maps.Map(mapDiv, options);

        var cities = [];
        cities.push(new google.maps.LatLng(40.756, -73.986));
        cities.push(new google.maps.LatLng(37.775, -122.419));
        cities.push(new google.maps.LatLng(47.620, -122.347));

        var infowindow;
        for (var i = 0; i<cities.length; i++) {
            //create markers for each city
            var marker = new google.maps.Marker({
                position: cities[i],
                map: map,
                title: "City Number " + i
            });

            (function (i, marker) {
                //create even listeners (closures at work)
                google.maps.event.addListener(marker, 'click', function () {
                    if (!infowindow) {
                        var infowindow = new google.maps.InfoWindow();
                    }
                    //set content
                    infowindow.setContent('City number ' + i);
                    //open the window
                    infowindow.open(map, marker);
                });
            })(i, marker);
        }
    };
})();

Three markers:
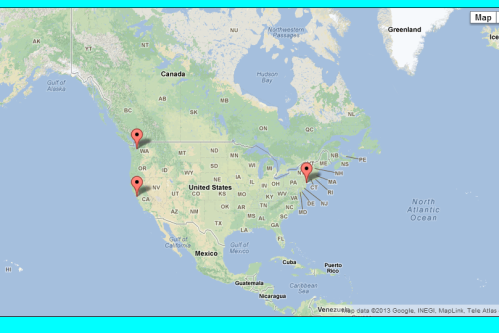
google-maps-api-more
Clicking on any of the markers results in the following:
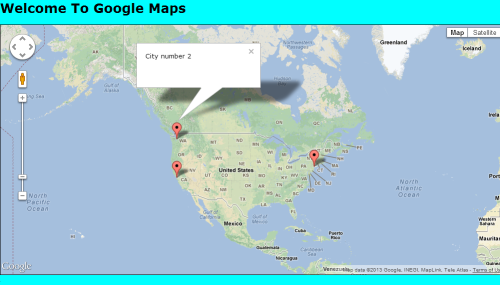
google-maps-apis-final

Everything up until line 11 should be second nature to you by now, I hope. Now, at line 12…15, I simply defined an array and added three cities to it.

On line 17 – I defined a variable infowindow which will come in handy when we want to avoid duplicating info windows by checking if one already exists.

On line 18…24 – I use a for loop to create markers and from

Line 26…37 – I used an anonymous function within the for loop to add event listeners to each of the markers. Everything within the anonymous function is much like what we have been doing all along – creating an info window, setting the content and finally opening it when a marker is clicked.

I am using closures here to avoid a situation where no matter which marker you click, the infowindow will open for the marker that was created last(always ‘infowindow number 3’). You can read more about closures by visiting Douglas Crockford’s Post .

I am going to stop here because I think this is long enough. I will do more fun stuff next time. If you notice any errors, please notify me and I will fix them as soon as possible. If you have any questions please let me know through the comments section. Hopefully this taught you something meaningful. Thank you for stopping by.
Programming With Google Maps APIs- part IV

Hello! If you have been here before, you might have noticed that I decided to change my blog theme and I hope you like this just like I do. I wanted to make reading easier and still maintain a cleaner look. That being said, let me start our 4th post on Google Maps APIs. My 3rd post had this code:

(function () {
    window.onload = function () {
        var mapDiv = document.getElementById('map');
        var latlng = new google.maps.LatLng(37.09, -95.71);

        var options = {
            center: latlng,
            zoom: 4,
            mapTypeId: google.maps.MapTypeId.ROADMAP,
            disableDefaultUI: true,
            navigationControl:true,
            keyboardShortcuts: false,
            disableDoubleClickZoom: true,
            draggable: false,
            streetViewControl: true,
            navigationControlOptions :{
                position: google.maps.ControlPosition.TOP_RIGHT,
                style: google.maps.NavigationControlStyle.ZOOM_PAN
            }
        };
        var map = new google.maps.Map(mapDiv, options);
    };
})();

Now let us move on to something new:

Controlling The Map Container

As I said yesterday(in post number 3), when I say ‘the map container’, I am referring to the html element(<div id=”map”>) that contains the map. The MapOptions object contains some properties that control the behavior of this map container.

noClear

Every time your map loads on the browser, it clears the map container (div element) of any content before inserting anything. Setting noClear to false will preserve the content of the map container. The opposite is true.

backgroundColor

This property sets the color of the container’s background. You will notice this when panning the map and before the map tiles are loaded. You can set its value using either hexadecimal value code starting with a ‘#’ symbol or using standard color keywords like ‘blue’, ‘white’ etc.

Code Example – noColor and backgroundColor

.
.
var options = {
        zoom: 3,
        center: new google.maps.LatLng(37.09, -95.71),
        mapTypeId: google.maps.MapTypeId.ROADMAP,
        noClear: true,
        backgroundColor: '#bbccff'
};
.
.

Controlling The Cursor

These set of properties control how the cursor will look like under certain circumstances.

draggableCursor

You can use this property to control what cursor to use when hovering over a draggable  object on the map – like the pegman! You can set it either by providing it with the name of the cursor like ‘crosshair’, ‘pointer’, or ‘move’, or using a url  to your own image. There are more names to explore.

draggingCursor

This is similar to draggableCursor except it controls the cursor being used while dragging an object in the map.

Combined Code Example:

var options = {
        zoom: 3,
        center: new google.maps.LatLng(37.09, -95.71),
        mapTypeId: google.maps.MapTypeId.ROADMAP,
        noClear: true,
        backgroundColor: '#bbccff',
        draggableCursor: 'move',
        //draggingCursor: 'move'
};

Controlling The Map Settings Using Methods

It has been fun changing properties of our map options. The question now remains: how do we change the same properties after the map is loaded? Don’t worry! There is a way out of this – the map object has methods.

There are two kinds of methods: the generic setOptions() method and specific methods for each of the properties.

setOptions

This is a method of the map object and it takes a mapOptions object as the only attribute. Using it simply entails creating an object literal and then passing it to this method.

var options = {
   zoom : 4
};

map.setOptions(options);

//or you can be cool and do this:

map.setOptions({
   zoom: 4,
   mapTypeId: google.maps.MapTypeId.SATELLITE
});

You can use the setOptions() method to change most of the map properties except a few:

  • backgroundColor
  • disableDefaultUI
  • noClear

That means that you should be careful to define these properties up front while initializing the map.

The Specific Methods

These types of methods are available for both setting and getting the values of the required properties of the mapOptions object: center, zoom and mapTypeId.

Getting and setting the zoom level

var zoomlevel = map.getZoom();
map.setZoom(18); //number

Getting and setting the center of the map

var center = map.getCenter();
map.setCenter(latlng: LatLng);

Getting and setting the mapTypeId

var maptype = map.getMapTypeId();
map.setMapTypeId(mapTypeId: MapTypeId)

Using the getter and setter methods for good!

Since we now know about the methods and the fact that we can use them to do some fun stuff to our map, like changing the map type and zoom, let us see how we can improve our map. Inside our index.html file, we add two buttons to get values and set values respectively.

<!DOCTYPE html>
<html lang="en">
    <head>
       <meta http-equiv="Content-Type" content="text/html; charset=UTF-8" />
   	  <title>Google Maps Tutorial</title>
   	  <script src="http://maps.google.com/maps/api/js?sensor=false"></script>
   	  <script src="map.js"></script>
   	  <link rel="stylesheet" type="text/css" href="main.css" />
    </head>
    <body>
        <h1>Welcome To Google Maps</h1>
        <input type="button" id="getValues" value="GET-VALUES" />
        <input type="button" id="setValues" value="SET-VALUES" />
        <div id="map"></div>
    </body>
</html>

And now the main code that does the job:

(function () {
    window.onload = function () {
        var mapDiv = document.getElementById('map');
        var latlng = new google.maps.LatLng(37.09, -95.71);

        var options = {
               zoom: 3,
               center: new google.maps.LatLng(37.09, -95.71),
               mapTypeId: google.maps.MapTypeId.ROADMAP,
               noClear: true,
               backgroundColor: '#bbccff',
               draggableCursor: 'move'
        };
        var map = new google.maps.Map(mapDiv, options);

        document.getElementById('getValues').onclick = function(){
            alert(map.getZoom());
            alert(map.getCenter());
            alert(map.getMapTypeId());
        }
        document.getElementById('setValues').onclick = function(){
            map.setOptions({
                center: new google.maps.LatLng(36.1000, 112.1000),
                zoom: 16,
                mapTypeId: google.maps.MapTypeId.SATELLITE
            });
        }
    };
})();

If you end up running this code on your own, try guessing where the second map shows (it is somewhere in North America). If you don’t know, you can copy and paste the coordinates shown above to the Google search bar. You can get the values by simply clicking the GET-VALUES button on top of the map. Either way, this is how our map looks like:

google-maps-api-methods
Clicking the SET-VALUES button will change our map from the above type to the one below showing a specific location(try guessing it first).

google-maps-last
Try zooming out as you see if you can identify this secret location.
Thank you for reading through this post. I will stop here because I believe I have done enough for today. If you have any questions, please ask me and I will be more than glad to answer them. Next post will include concepts like markers and more fun features. See you soon!

Programming With Google Maps APIs – Part III

Hello! Thanks for stopping by. I didn’t post anything yesterday because I was asked to read and review an AngularJS Starter book which ended up taking all my time. It was a good experience because I learned some new stuff. That being said, today, I am going to continue with our Google Maps APIs series. My last post  ended with the code below and so let us pick up from there:

(function () {
    window.onload = function () {
        var mapDiv = document.getElementById('map');
        var latlng = new google.maps.LatLng(37.09, -95.71);

        var options = {
            center: latlng,
            zoom: 4,
            mapTypeId: google.maps.MapTypeId.ROADMAP,
            mapTypeControl: true,
            mapTypeControlOptions : {
                style: google.maps.MapTypeControlStyle.DROPDOWN_MENU,
                position : google.maps.ControlPosition.TOP,
                mapTypeIds :
                    [ google.maps.MapTypeId.ROADMAP,
                      google.maps.MapTypeId.SATELLITE ]
            }
        };
        var map = new google.maps.Map(mapDiv, options);
    };
})();

navigationControl

This property displays or hides the navigation control. That is the control that typically resides in the upper-left side of the map with which you can zoom and sometimes pan the map.

Code Example:

.
.
 var options = {
            center: latlng,
            zoom: 4,
            mapTypeId: google.maps.MapTypeId.ROADMAP,
            disableDefaultUI: true,
            navigationControl:true //here
        };
.
.

navigationControlOptions

With the navigationControlOptions property, you determine the look of the navigationControl. It pretty much works like mapTypeControlOptions by taking an object as its value. The object is of type: google.maps.NavigationControlOptions and it has two properties : position and style. It might sound familiar if you read my first two posts.

  1. position – this property is of type google.maps.ControlPosition.
  2. style – this property comes in several flavors and they all reside in google.maps.NavigationControlStyle. They are :
  • DEFAULT – if set to this value, the control will vary according to the map size and other factors. It displays either small or large.
  • SMALL – this is, well, the small control. Only allows you to zoom the map.
  • ANDROID – android anybody? This control is specifically tailored for android smartphones.
  • ZOOM_PAN – this is the large control that lets you to both zoom and pan the map.

Code Example:

.//using both position:TOP_RIGHT and style:ZOOM_PAN
.
var options = {
            center: latlng,
            zoom: 4,
            mapTypeId: google.maps.MapTypeId.ROADMAP,
            disableDefaultUI: true,
            navigationControl:true,
            navigationControlOptions :{
                position: google.maps.ControlPosition.TOP_RIGHT,
                style: google.maps.NavigationControlStyle.ZOOM_PAN
            }
        };
.
.

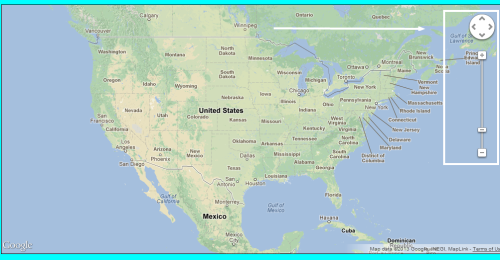
This is how the map will look like with the code above:

google-maps-api-3

As you can see, the position is top-right and the style is zoom_pan meaning you can do both zooming and panning of the map. In order to use the above property, you must set navigationControl to true.

scaleControl

This property determines whether the scale control will be displayed or hidden. The default value is false meaning it is not displayed. If you want to show it on your map, you must set it to true.

.
.
var options = {
    zoom: 8,
    .
    .
    scaleControl: true //this line
};

scaleControlOptions – Using this property, you control how scaleControl will be displayed. It takes an object of type google.maps.ScaleControlOptions. Just like NavigationControlOptions, it has two properties: guessed them yet? Position and Style. In order to use scaleControlOptions, you must also use and set scaleControl to true. (Sounds familiar right?).

keyboardShortcuts

This property enables or disables the ability to use the keyboard to navigate the map. It is true by default but you can change it to false to disable it.

disableDoubleClickZoom

Double-clicking on a map normally zooms in but if you want to disable that property, you set disableDoubleClickZoom to true.

draggable

You can pan the map by default by simply dragging it around. If for some personal reason you would like to disable it, set draggable to false.

scrollwheel

You can use this property to decide whether you want to use your mouse to zoom in and out by simply scrolling the wheel of your mouse. It is set to true by default. You can, for some alien reason, set it to false to disable it.

streetViewControl

This property shows or hides the Street View Control (wildly known as pegman). The default value of this property is false. You can set it to true to enable it. If you set the value to true, the map will display an orange pegman right above the zoom control.

Combined Code Example:

.
.
var options = {
            center: latlng,
            zoom: 4,
            mapTypeId: google.maps.MapTypeId.ROADMAP,
            disableDefaultUI: true,
            navigationControl:true,
            keyboardShortcuts: false,
            disableDoubleClickZoom: true,
            draggable: false,
            streetViewControl: true,
            navigationControlOptions :{
                position: google.maps.ControlPosition.TOP_RIGHT,
                style: google.maps.NavigationControlStyle.ZOOM_PAN
            }
        };
        var map = new google.maps.Map(mapDiv, options);
.
.

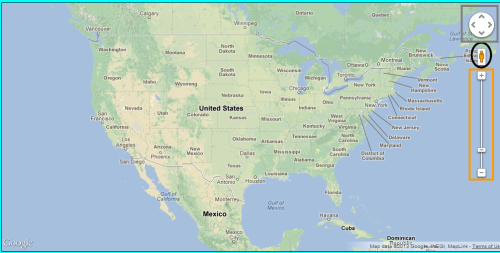
Before I finish this post for today, I would like to show you a snapshot of our final map with the above code:

google-maps-api-controls
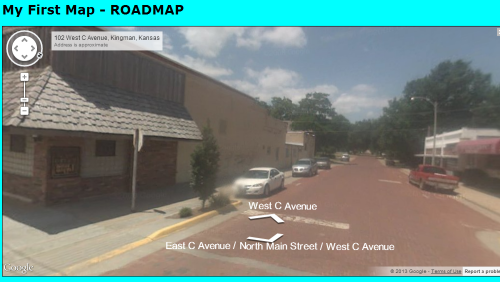
I used squares and rectangles to indicate the controls and their positions. You might be curious to know what really happens when you drag the pegman around! This is what happened when I dragged it to some street in Kansas! It switched to Street View mode – Warning: you might see someone you know, seriously, you might!
google-maps-api-kansas
I told you it was pretty clear you might actually see your friend sneaking around. The good part, ‘we are not in Kansas anymore’.

Thanks again for stopping by and I hope you learned something from this post. Next time I will jump into Controlling the Map Container – the html div element that contains our map, then some more cool and fun stuff. If you spot an error, please let me know. Please share this post if you like it. ‘See you’ soon and take care of yourself!

Programming With Google Maps APIs – Part II

Hi! First of all, thank you for stopping by. It gives me strength to keep sharing what I like because I know it is all worth the effort. That being said, today, I am going to expand on what I did on Google Maps API part I by adding more features to our map. Last time, our map.js file has the following code:
(function () {
    window.onload = function () {
        var mapDiv = document.getElementById('map');
        var latlng = new google.maps.LatLng(37.09, -95.71);

        var options = {
            center: latlng,
            zoom: 4,
            mapTypeId: google.maps.MapTypeId.ROADMAP
        };
        var map = new google.maps.Map(mapDiv, options);
    };
})();

Controlling The User Interface

  • disableDefaultUI – setting this property to true disables the default user interface. This further means the default zoom control and the map type chooser will not be displayed. Even if you disable the default user interface, you can still enable these controls individually. The default value is false. Example:
.
.
var options = {
   center: new google.maps.LatLng(37.09, -95.71),
   zoom : 8,
   mapTypeId : google.maps.MapTypeId.ROADMAP,
   disableDefaultUI : true
   //Alternatively, you can seperately enable or disable:
   //mapTypeControl: true
   //zoom
};
.
.

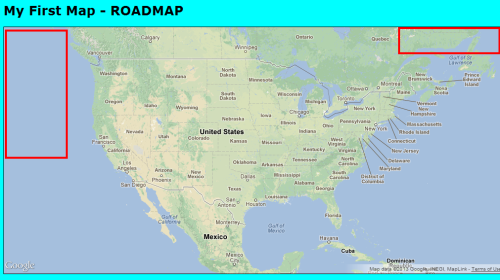
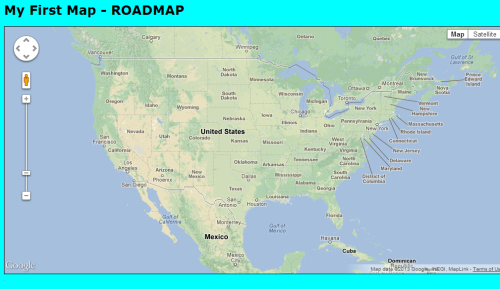
Before disabling the default user interface, the map looked like this:
google-maps-api-roadmap
After disabling it, you will see something like this:

google-maps-api-disableui
As you can see, the rectangles represent the original position of our default user interfaces.

mapTypeControlOption

In a case where you decide to have mapTypeControl visible, then mapTypeControlOption controls how it will be displayed. It can look different depending on circumstances or your own decisions to place it where you want. One good thing also is that you can define what map types you would like the user to choose from. This property takes an object of type google.maps.MapTypeControlOptions as its value. It has three properties:

  1. style
  2. position
  3. mapTypeIds

As you might have guessed, while using mapTypeControlOptions, you must always remember to set mapTypeControl to true. 

Style

This property determines the appearance of the control. The values you can choose from reside in the google.maps.MapTypeControlStyle object. The choices are:

  1. DEFAULT – the look will vary depending on the window size and maybe other factors. If the map is big enough, you get a horizontal bar displayed, otherwise, a drop-down menu will be shown.
  2. HORIZONTAL_BAR – this displays the horizontal bar!
  3. DROPDOWN_MENU – displays a drop-down list to either save space or some other reason!

Code Example:

(function () {
    window.onload = function () {
        var mapDiv = document.getElementById('map');
        var latlng = new google.maps.LatLng(37.09, -95.71);

        var options = {
            center: latlng,
            zoom: 4,
            MapTypeId: google.maps.MapTypeId.ROADMAP,
            mapTypeControl : true,
            mapTypeControlOptions : {
               style : google.maps.MapTypeControlStyle.DROPDOWN_MENU
           }
        };
        var map = new google.maps.Map(mapDiv, options);
    };
})();

Position

As you might have noticed, the default position of this control is in the upper-right corner. You can easily define it to appear somewhere beside the upper-right corner. To do that, you will need to use the google.maps.ControlPosition class. This class has several predefined positions you can choose from: BOTTOM, BOTTOM_LEFT, BOTTOM_RIGHTLEFT, RIGHT, TOP, TOP_LEFT, TOP_RIGHT.

Code Example: Style: DROPDOWN_MENU, Position: TOP

(function () {
    window.onload = function () {
        var mapDiv = document.getElementById('map');
        var latlng = new google.maps.LatLng(37.09, -95.71);

        var options = {
            center: latlng,
            zoom: 4,
            mapTypeId: google.maps.MapTypeId.ROADMAP,
            mapTypeControl: true,
            mapTypeControlOptions : {
                style: google.maps.MapTypeControlStyle.DROPDOWN_MENU,
                position : google.maps.ControlPosition.TOP
            }
        };
        var map = new google.maps.Map(mapDiv, options);
    };
})();

The outcome is:

google-maps-api-position

mapTypeIds

You use this property to control which map type to display. It takes an array of available MapType controls you want to use. The code below shows how to add it to our map example:

(function () {
    window.onload = function () {
        var mapDiv = document.getElementById('map');
        var latlng = new google.maps.LatLng(37.09, -95.71);

        var options = {
            center: latlng,
            zoom: 4,
            mapTypeId: google.maps.MapTypeId.ROADMAP,
            mapTypeControl: true,
            mapTypeControlOptions : {
                style: google.maps.MapTypeControlStyle.DROPDOWN_MENU,
                position : google.maps.ControlPosition.TOP,
                mapTypeIds :
                    [
                    google.maps.MapTypeId.ROADMAP,
                    google.maps.MapTypeId.SATELLITE
                    ]
            }
        };
        var map = new google.maps.Map(mapDiv, options);
    };
})();

The final map now has a drop-down menu with a list of two MapTypeIds: ROADMAP and SATELLITE. Let us finish this post with a look!

final-google-map-api
I am going to stop here for today because I don’t want to make this post too long. So, I want to wrap up by saying congratulations for keeping up with me. Next time I will do some work on navigationControl and more! Thanks for stopping by and if you liked this post, please drop me a line and share it online! See you soon. If you have questions, please ask me!

Programming With Google Maps APIs – part I

Hello! I hope you are doing fine! This week, I am going to do some programming with Google Maps APIs. Perhaps you have been curious and are interested in playing around it especially considering the vast smartphone apps opportunities. You might be thinking about an app that will help you track Santa (during Christmas for that matter) or restaurants you visit. Let us get started! So, here is what you will see when done with the first step int this tutorial!

google-maps-api-roadmap

Just before I show you another variation of the above image, I would like to say that am using Javascript – a wildly used front-end language. As you can see above, that map is a roadmap. Now let us look at another type : satellite.

google-maps-api-satellite

There you have it. By the end of this post, you might be surprised by how easy it is to arrive at a functional map! I don’t want to waste your time, so let us get to it.

The index.html file

<!DOCTYPE html>
<html lang="en">
    <head>
       <meta charset=UTF-8" />
   	  <title>Google Maps Tutorial</title>
   	  <script src="http://maps.google.com/maps/api/js?sensor=false"></script>
   	  <script src="map.js"></script>
   	  <link rel="stylesheet" type="text/css" href="main.css" />
    </head>
    <body>
        <h1>My First Map - ROADMAP</h1>
        <div id="map"></div>
    </body>
</html>

That, just so you know, is all you need in your html file! First, the most important part to notice is the script source file to point to where the Google Maps api resides. You must include it in your html file. The other important thing is the div element inside the body tag. That is where your map will be displayed when your page is loaded on the browser. That is all. Now let us look at the other script file included above (map.js).

The map.js file

(function () {
    window.onload = function () {
        var mapDiv = document.getElementById('map');
        var latlng = new google.maps.LatLng(37.09, -95.71);

        var options = {
            center: latlng,
            zoom: 4,
            mapTypeId: google.maps.MapTypeId.ROADMAP
        };
        var map = new google.maps.Map(mapDiv, options);
    };
})();

Believe it or not, the above code is the main part of our map generator. This however does not mean that you cannot have hundreds or even thousands of lines of code. In fact, this is just the basic part of Google Maps.

As seen above, I encapsulated the main code by wrapping it around a self-executing function. This is common in Javascript. It looks like this:

(function(message){
  //do really important stuff here

  alert(message)

})("Some good message here");

That being said, the next line in our code ensures that the main code is executed only after the browser window has loaded(window.onload). We then store a reference to our map id in a mapDiv variable. We will need it later because that is where our map will display.

The next variable(latlng) is, you guessed it, an instance of the LatLng object created using the new keyword. LatLng() takes at least two arguments (latitude and longitude of a location you want to display).

MapOptions

MapOptions resides in an object that is passed to the map. It contains the information about how you want your map to look and behave. This object is in a form of an object literal(creating an object on the fly – means that you supply values while you create it). Now using javascript, we create a variable called options and give it three properties that a map requires in order for it to work.

  1. center – this defines the center of a map with a coordinate. The value must be of type google.maps.LatLng(described earlier).
  2. zoom – defines the initial zoom level of the map. Must be a number between 1(when zoomed all the way out) and 23(when zoomed all the way in). The deepest zoom level can vary depending on the available map data.
  3. mapTypeId – defines what type of map you initially want to display. All map types are found in google.maps.MapTypeId (examples: ROADMAP, SATELLITE).
//create an object literal - options
var options = {
   center : latlng,
   zoom: 10,
   mapTypeId : google.maps.MapTypeId.SATELLITE //ROADMAP
};

Now we can complete our first map by actually creating it. How simple right?

//All maps are of type google.maps.Map

var map = new google.maps.Map(mapDiv, options);

//We pass mapDiv - our map id reference inside our index.html file
//and secondly, options literal object we just created above.

That is all you need to have a working map. I hope this helped you learn something useful. Next time, I will be adding new stuff and making our map more interesting and appealing!

If you have any questions, please let me know through the comments section. Any errors? Please point them out to me and I will fix them. Thanks for stopping by and please subscribe for updates if you find this blog useful.

How To Install Pik and Run Commands on Git Bash – Ruby

A few weeks or so ago, I was learning Ruby on Rails and I couldn’t avoid running into the version control issue with Ruby. Consider a situation where you are running Ruby 1.93 but you want to write code that works with a different version of Ruby like Ruby 2.00. The solution is to perhaps install more than one version right? Now after installing more than one version, you might be wondering how to switch from one version to another. That is why I am doing this tutorial.

This tutorial is meant for Windows computers! The idea is to install a ruby version manager for Windows. People using Macs might be familiar with something called rvm for … you guessed it … ruby version manager. People using windows however, have pik and it is totally free to download and use. So, without much ado, here is the video tutorial I created to make things easier. It is complete with examples.

So, there you have it. I hope it helped you and if you run into any problem, do not hesitate to ask because I will be more than happy to help.

Please remember to subscribe if you like what you see here. Thanks for stopping by and please leave me some comments.

Stay safe and see you soon!